THESE ACHIEVEMENTS HAS CHANGED
The Turf War Heroic has been replaced with a new Heroic mission ‘We’re Wanted Men’.
If you previously obtained all the Turf War Achievements prior to the heroic’s removal in Game Update 6.1.1, the achievements have transferred over to the new ones for the new mission. So you do not have to redo the mission to get the achievements. See the Tweet below for preliminary info on the We’re Wanted Men’ Heroic. (Click on the Tweet to see full thread)
A new heroic, Turf War was added to Mek-Sha in Game Update 6.0.1. Here is a guide to how to complete it and the corresponding achievements.
Before we get started though, there are a couple of things to keep a note of and a couple of key requirements in order to be able to do the Heroic to get the Achievement.
- Your character must have completed the Onslaught story to be able to pick up [Heroic 4] Turf War.
- Completing [Heroic 4] Turf War will only count towards <The Don> achievement for the person in the group who buys and uses the contract. However, everyone in the group who has the Heroic mission will still get Mission completion credit and rewards.
- Once you complete the achievement and get the reward, you only get it on one character. There is currently no way, that I know of, to get the reward on your other characters even if you used those characters to get the achievement. So make sure the final heroic you do that’ll finish <The Don> Achievement is on the character you want the reward on.
This heroic is similar to the Golden heroic on Dantooine in that you have to pay credits to complete it. However, with Turf War you still have to put some work in first (kill mobs) to complete the heroic.
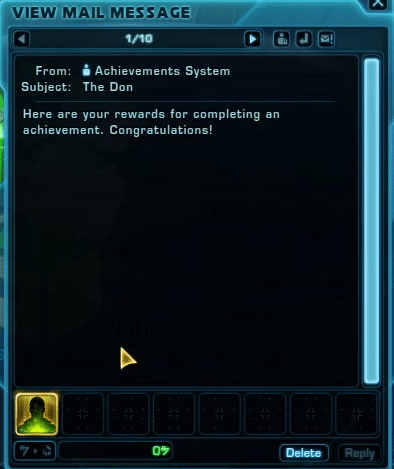
<The Don> Achievement
The Achievement can be found under Achievements -> Location -> Mek-Sha -> Heroic Missions.

- Enlist the Dar’manda Gang to Help (x10)
- Enlist the Dire Skull Gang to Help (x10)
- Enlist the Harido Wald Gang to Help (x10)
- Enlist the Nova Blade Gang to Help (x10)
In order to get <The Don> Achievement, you need to complete the heroic 10 times per encounter scenario totalling 40 times. The total cost of getting the achievement, assuming you completed it 20 times using the discounted contracts, is 37,860,000 million Credits (320,000 + 37,500,000). See Contracts section for additional info.
There are two additional achievements that go with this achievement.


- Enlist the Dar’manda Gang to Help (x1)
- Enlist the Dire Skull Gang to Help (x1)
- Enlist the Harido Wald Gang to Help (x1)
- Enlist the Nova Blade Gang to Help (x1)


- Enlist the Dar’manda Gang to Help (x5)
- Enlist the Dire Skull Gang to Help (x5)
- Enlist the Harido Wald Gang to Help (x5)
- Enlist the Nova Blade Gang to Help (x5)
<The Don> Achievement Reward
The reward for completing the achievement is the ‘Street Cred’ item. Once you complete the Achievement, the reward will arrive in the mail shortly after on the character you finished the achievement on.

When you activate it, it creates a grey-purple-black visual effect on your character that lasts for five minutes. You can remove it, if you wish, by clicking it off of your buff bar.


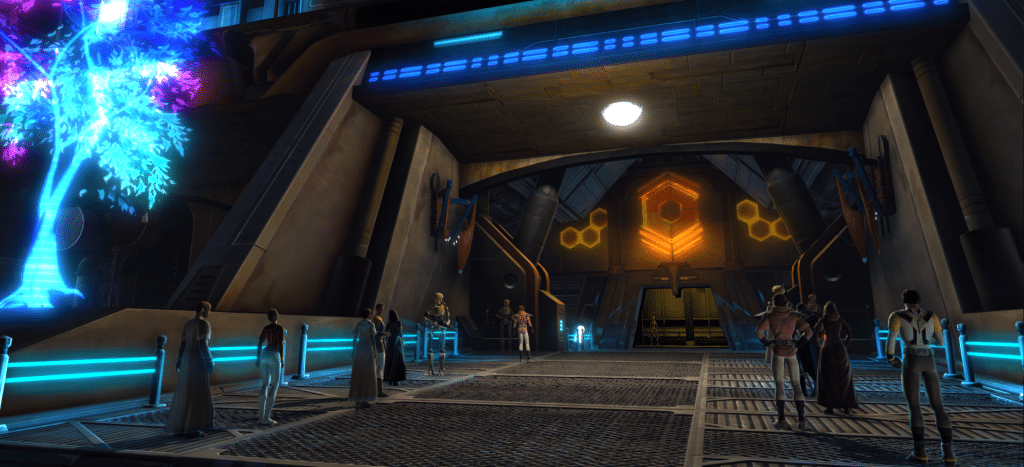
[Heroic 4] Turf War
With tensions running high among the gangs of Mek-Sha, the standing of your allies hangs in the balance. Luckily, local crews are always looking to drum up business–recruiting muscle from other gangs to your cause should be no trouble.
This heroic is identical for both factions. Choices made during the Onslaught story can impact the pricing of the contract purchased at the end of the Heroic.
Since completing the heroic only counts towards <The Don> Achievement for one person, it is better to solo this heroic. It is also easier to have multiple characters who have completed the story so you can get the achievement faster.
I was able to complete all four encounters as both a DPS (unoptimised, no set bonus gear) with a level 50 healing companion and as a healer (mostly BiS) with a level 50 DPS companion.
Choose a Gang to Help
Go to Slugfall Cantina, speak to representatives of gangs that have offered assistance, and recruit a crew to temporarily help keep things in order on Mek-Sha. Choose carefully: siding with one gang will surely draw the ire from their rivals.
Go to the Slugfall Cantina and talk to the gang representative you wish to ally yourself with. Click on a gang representative and go through a brief KOTOR-style conversation.


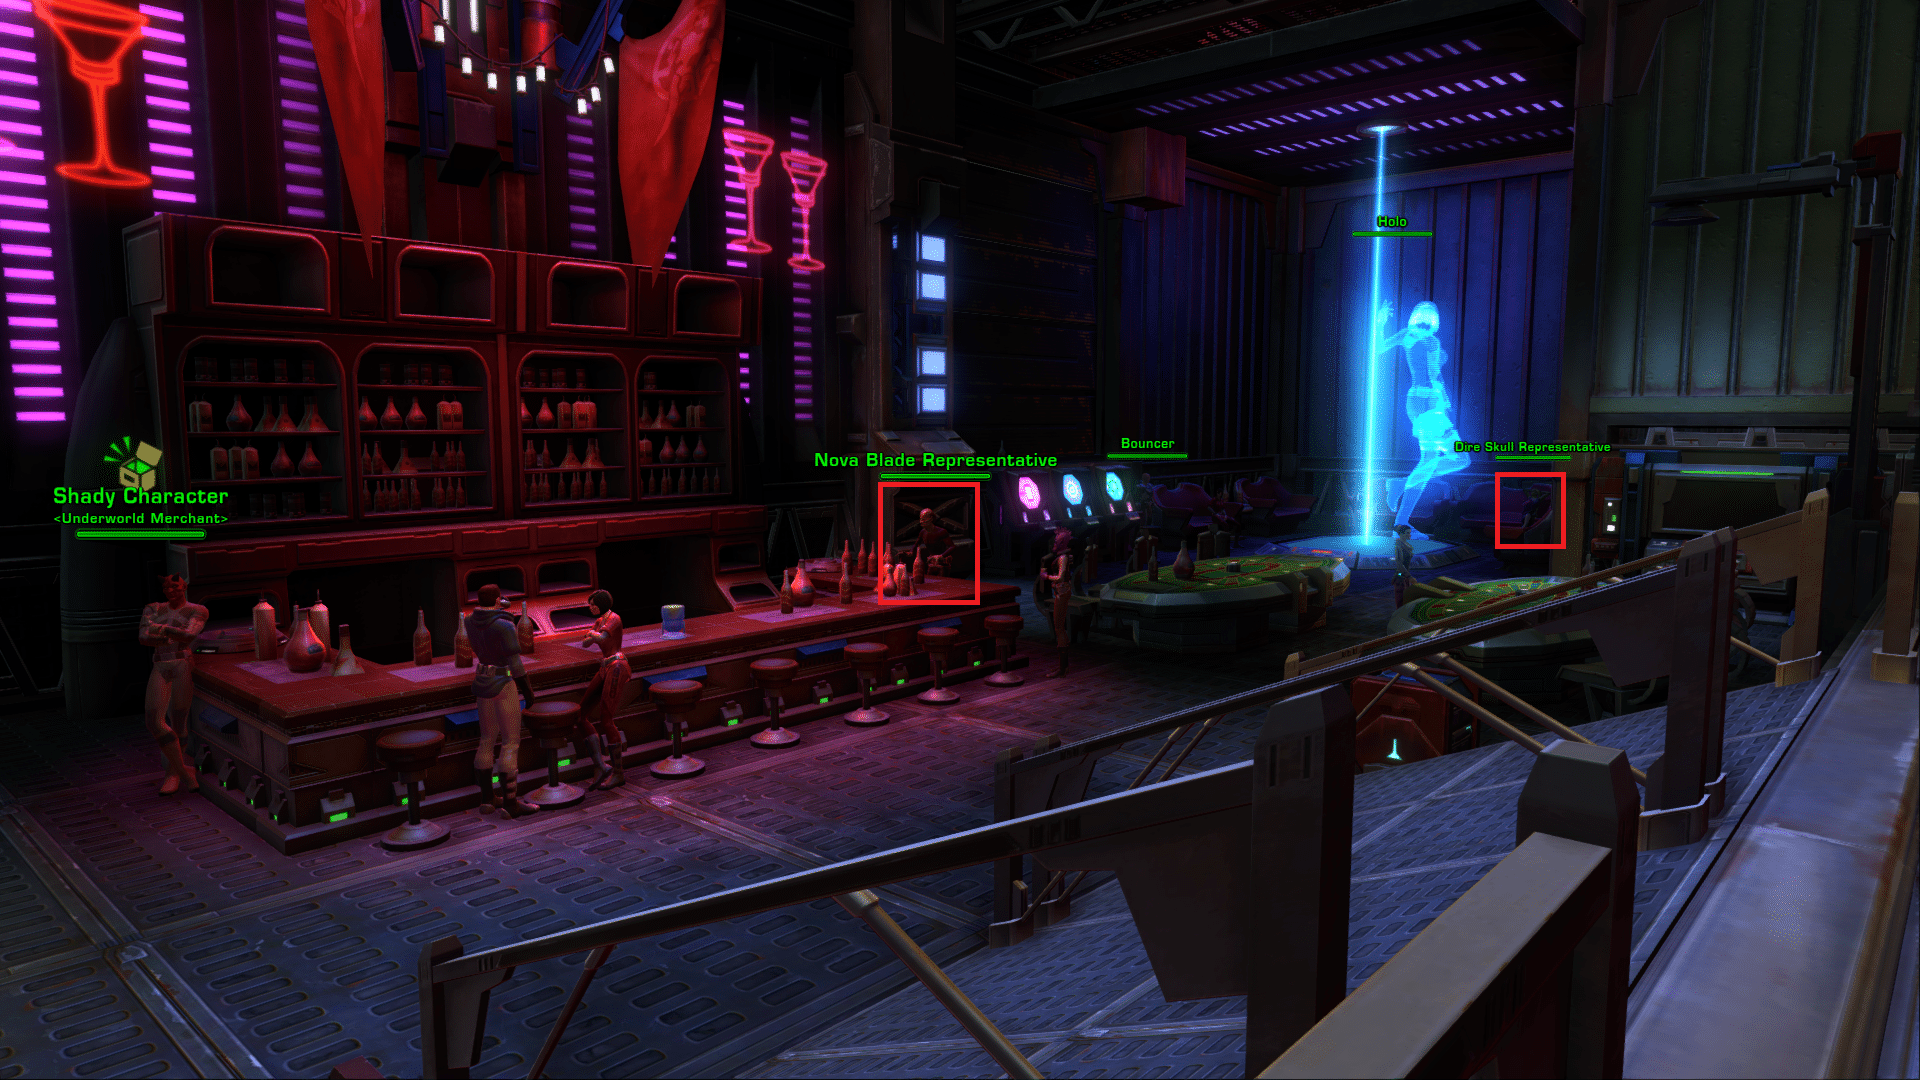
Keep in mind that choices in the story can have an impact. It is better to choose the gang you allied with in the Onslaught story. See Contracts section for more information.
Defeat Rival Gang Leaders
The crew representative has asked you to take out the other gang leaders in an all-out bar brawl. Defeat the leaders and prove you’re worth fighting for.
Once you have chosen which gang to help, go into the instance and defeat the other gang leaders. When you enter, you will find the gang leaders ready to attack each other. The one you’re allied with will be green and will help you defeat the other gang leaders. There are some minor variations in how the encounter plays out depending on who you’ve allied with.
Before we get into specifics, there are a couple of things to remember for all encounters.
- There is an RNG element to all encounters. The behaviour of the gang leaders varies–as in who they choose to attack varies each time. Each encounter is always different. Sometimes they’ll all attack you, sometimes they’ll attack each other and ignore you, sometimes one leader will attack you while the other leaders attack each other etc. etc.
- Don’t panic if you die. If all the leaders are in combat, then the fight will continue. You can rezz in the room or rezz to a med centre and come back. If you are too close to the gang leaders, especially the Nova Blade or Dire Skull one when you die there is a good chance their AOE abilities will kill you before you can heal up. If you rezz to a med centre, keep in mind that if one of the gang leaders dies while you’re out of the instance, you won’t get credit for the kill and you will have to reset the phase.
- If the gang leader you’re allied with dies in the encounter, it does not affect the outcome of the heroic at all.
The Nova Blade allied encounter is the easiest while the Harido Wald allied encounter is the most annoying.
Before we get into the individual encounters, let’s look at some of the tools you get to help you and the debuffs the gang leaders have.
Mechanics
There are four different items you can use to aid you in defeating the gang leaders. The most important one is the Basket of Fruit. Click on each one to gain a temporary item that will appear in your temporary ability bar. Each item only has once ‘use’ so once you’ve used an item, you need to pick it up again to be able to use it again.

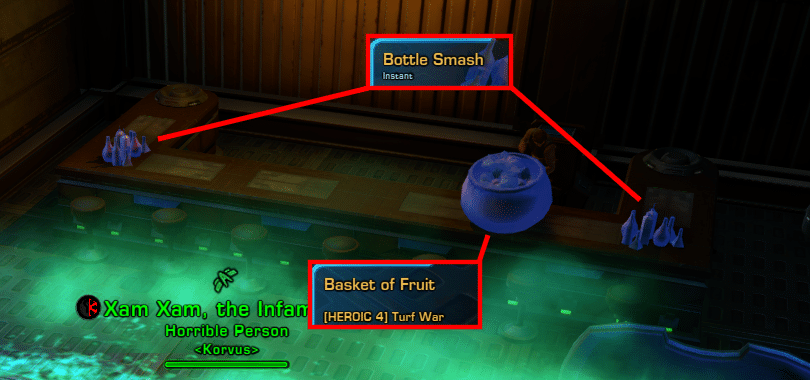
- Basket of Fruit – Fruit Throw (Nova Blade)
- Chair – Chair Slam (Harido Wald)
- Water Glass – Douse (Dire Skull)
- Bottles – Bottle Smash (Dar-manda)


The Gang Leaders have the following buffs on them.


- All Gang Leaders
- Boss Immunity – Immune to incapacitating and movement-impairing effects.
- Steadfast – Immune to physics and knockbacks.
- Dar’manda
- Infused Strength – Increased Damage
- Infused Strength
- Dire Skull
- Drunken Rage – Increased Alacrity
- Drunken Rage
- Harido Wald
- Loaded Rejuvenation – Passively Regenerates Health
- Laced Rejuvenation
- Nova Blade
- Liquid Courage – Damage Immunity
- Liquid Courage
Some of the gang leaders also have some ability buffs.
- Dar’manda
- Armour Field – Armour increased (30 seconds).
- Harido Wald
- Protected – Armour rating increased.
- Nova Blade
- Charged Weapon – Melee attacks have a chance to deal additional energy damage (1 minute).
- Energy Shield – Energy damage resistance increased.
The only gang leader you really need to worry about is the Nova Blade one given his damage immunity. The other gang leaders are fairly harmless and some of the tools you use against the other gang leaders don’t always work anyway. Harido Wald’s health regeneration is pretty minimal and you should be able to out-DPS it.
Now let’s get into the specifics about each of the encounters. Dar’manda and Dire Skull allied encounters are pretty similar. But the general rule for all encounters (where you are not allied with the Nova Blade gang leader) is to kill the Nova Blade gang leader first.
Dar’manda Allied Encounter
It is best to kill the Nova Blade Gang Leader first to avoid losing the tools (Fruit Basket) needed to defeat him. Sometimes killing one of the other gang leaders before the Nova Blade one can cause the tools to no longer be clickable which makes it near impossible* to defeat the Nova Blade.
Click on a Fruit Basket to get a piece of Fruit. Throw a piece of Fruit at him to make him no longer immune to damage. Using the Thro Fruit temporary ability on the Nova Blade will remove is damage immunity buff temporarily. After around 5seconds, the damage immunity buff will come back and you’ll have to throw fruit at him again.
It is best to try and engage him on his own. Most of the time, clicking on the fruit basket closest to the door will aggro him. You can them move him into the corner away from the other gang leaders. Get him to at least 50% health before engaging the other gang leaders. Move him into the middle of them to try and get the other gang leaders to aggro to him (since he regularly does AOE attacks).
Once the Nova Blade gang leader is dead, kill the other gang leaders in any order you see fit.
Dire Skull Allied Encounter
It is best to kill the Nova Blade Gang Leader first to avoid losing the tools (Fruit Basket) needed to defeat him. Sometimes killing one of the other gang leaders before the Nova Blade one can cause the tools to no longer be clickable which makes it near impossible* to defeat the Nova Blade.
Click on a Fruit Basket to get a piece of Fruit. Throw a piece of Fruit at him to make him no longer immune to damage. Using the Thro Fruit temporary ability on the Nova Blade will remove is damage immunity buff temporarily. After around 5seconds, the damage immunity buff will come back and you’ll have to throw fruit at him again.
It is best to try and engage him on his own. Most of the time, clicking on the fruit basket closest to the door will aggro him. You can them move him into the corner away from the other gang leaders. Get him to at least 50% health before engaging the other gang leaders. Move him into the middle of them to try and get the other gang leaders to aggro to him (since he regularly does AOE attacks).
Once the Nova Blade gang leader is dead, kill the other gang leaders in any order you see fit.
Harido Wald Allied Encounter
For this encounter, it is crucial that you defeat the Nova Blade Gang leader first to avoid losing the tools (Fruit Basket) needed to defeat him. If any of the other leaders die first, the clickable items around the room will no longer be clickable. Making it almost* impossible to defeat the Nova Blade Gang leader.
Click on a Fruit Basket to get a piece of Fruit. Throw a piece of Fruit at him to make him no longer immune to damage. Using the Thro Fruit temporary ability on the Nova Blade will remove is damage immunity buff temporarily. After around 5seconds, the damage immunity buff will come back and you’ll have to throw fruit at him again.
It is best to try and engage him on his own. Most of the time, clicking on the fruit basket closest to the door will aggro him. You can them move him into the corner away from the other gang leaders. Get him to at least 50% health before engaging the other gang leaders. Move him into the middle of them to try and get the other gang leaders to aggro to him (since he regularly does AOE attacks).
Once the Nova Blade gang leader is dead, kill the other gang leaders in any order you see fit.
Nova Blade Allied Encounter
For this encounter, you can pretty much just sit back and let the Nova Blade Gang Leader do all the work. Since the other gang leaders will be barely able to damage him it should be pretty straight forward. The only issue you’ll have is if all the other gang leaders decide to attack you and/or your companion. But remember, don’t panic if you die!
*Even though the Nova Blade Gang leader is immune to damage, the other NPC’s can still occasionally get an attack through so it is possible to eventually defeat him but it will take a very, very long time depending on his HP when the fruit basket disappears.
Obtain and Sign an Employment Contract
Now that you’ve earned the support of the gang, seal the deal by signing an employment contract with the gang negotiator.
Once you have defeated the Gang Leaders, a gang negotiator NPC will appear who will sell you a Contract. You have to purchase and use the contract to complete the heroic.
Contract Costs
The cost of the contract varies due to choices made in the Onslaught story.
So if you allied with Harido Wald during the story, the contract you get from them at the end from the heroic is considerably cheaper than they normally are, likewise if you allied with Dar’manda.
| GANG | ONSLAUGHT ALLY COST | NORMAL COST |
| Dar’manda | 18,000 Credits | 1,875,000 Credits |
| Dire Skull | – | 1,875,000 Credits |
| Harido Wald | 18,000 Credits | 1,875,000 Credits |
| Nova Blade | – | 1,875,000 Credits |


Once you have purchased the contract, click on it in your inventory to complete the heroic.
Note, you cannot buy another contract and as soon as you ‘use’ it, the negotiator disappears preventing you from buying another contract. You also cannot purchase another contract if you already have one in your inventory.
Heroic Rewards
- Credits – 31,385
- Renown – Varies
- Light/Dark Side Points – Varies
- Locked Supply Crate: Smuggled Goods

That concludes the guide. Thanks for reading! If you have any questions or comments, feel free to ask!