
Intro
Madness Sorcerer, previously known as ‘Sadness Sorcerer’, in 5.0, got some good loving from Bioware in the most recent expansion – 6.0 ‘Onslaught’. A fairly easy class to learn the basics, but takes a while to master, Madness Sorcerer is a dot spec class that is excellent in single target and AoE damage situations.
Republic Side equivalent – Balance Sage
Update 6.1.3
Over the last couple of months since first creating this guide, there have been some minor changes to passives, set bonuses, gearing and new findings regarding rotations.
Recent Changes
Update 6.1
- Force Horrors – Lvl 36 Increases all periodic damage dealt by 15% (Changed from 10%)
Update 6.1.1
- Gathering Storm Rebalance
- (2) +2% Mastery
(4) Force Speed makes your next direct Force attack deal 20% more damage and Force attacks deal 20% more damage while Polarity Shift is active.
Changed – (6) Activating Force Speed reduces the cooldown of Polarity Shift by 5 seconds (down from 10seconds), and the duration of using Polarity Shift is 5 seconds (down from 10 seconds). The set bonus no longer requires Polarity Shift to be used whilst Force Speed is active to extend the duration.
- (2) +2% Mastery
- Disintegration – Lvl 32 Increases the critical chance of Force Lightning and Lightning Strike by 15%. (Changed from 5%)
- Fulminating Current – Lvl 64 Dealing damage with Force Lightning increases the critical chance of your damaging periodic effects by 3% (Changed from 2%) for 10 seconds. Stacks up to 4 times.
- Tempest of Rho – Parse name was updated to avoid confusion when using it
Update 6.1.3
- Unnatural Preservation no longer generates threat.
Rotation
Due to the changes mentioned above the Madness rotation can be slightly altered. For single target DPS, there are currently two schools of thought. The Lightning Strike rotation explained below, and the Force Lightning Spam rotation. The differences between the two rotations in terms of DPS output in live (operations, flashpoints and possibly PvP) is minimal in most situations. The differences being that the Lightning Strike rotation has a higher minimum DPS and a lower maximum whilst the Force Lightning rotation has a lower minimum but higher maximum DPS.
Gearing
All gear pieces gathered from Flashpoints and Operations or brought from the vendor on the fleet.
Set Bonus
Gathering Storm 6 pieces with 1 piece of Amplified Champion – Ideally, you would want the headpiece to be Amplified Champion as it won’t compromise the set bonus whilst doing Hateful or Dreadful Entity
Gathering Storm`
- (2) +2% Mastery
- (4) Force Speed makes your next direct Force attack deal 20% more damage and Force attacks deal 20% more damage while Polarity Shift is active.
- (6) Activating Force Speed reduces the cooldown of Polarity Shift by 5 seconds (down from 10seconds), and the duration of using Polarity Shift is 5 seconds (down from 10 seconds). The set bonus no longer requires Polarity Shift to be used whilst Force Speed is active to extend the duration.
Amplified Champion
- Additional Combat Amplifier on the gear piece of the first prototype (blue) quality.


Tacticals
Tempest of Rho – Single Target
Lightning Strike has a 100% chance and Force Lightning has a 50% chance to cause Creeping Terror to tick an additional time whenever they deal damage.
Slow Mercy – AoE
Death Field spreads Force Slow’s effect. Demolish hits all nearby targets affected by your Deathmark and Force Storm does 15% more damage to targets affected by your Deathmark.
Amplifiers
- Force Sensitivity (+1.00% – Increases the damage dealt by Force attacks)
- Total +9.40% (9 Versatile 80s Armorings + 1 amp champ)
OR
- Periodic Intensity (+2.20% – Increases the damage dealt by periodic effects)
- Total +20.68% (9 Versatile 80s Armorings + 1 amp champ)
The difference between Periodic Intensity and Force Sensitivity is very minor. In terms of single target DPS fight, you’d get virtually the same benefit from either amp. Force Sensitivity would be slightly better if using the Lightning Strike rotation. With the Force Lightning spam rotation, both amps will work, but you’ll benefit more from Periodic Intensity if you’re lucky with Tempest of Rho procs, but if your unlucky Force Sensitivity will balance it out. Ultimately it is a personal choice, Force Sensitivity will buff all your damage and if you play Lightning you won’t need two armor sets or have to swap armorings, whilst Periodic Intensity will make your dots tick harder which for AoE fights would be better.
Stats
- Accuracy – 1590 (Initiative R-14, R-15, R-9 + Kyrprax Proficient Stim + 1 Acc Aug
- Alacrity – 1213 (1.4 gcd) (Nimble R-14 x2, R-12)
- Critical – 3278 (Adept 80, 13 Crit Augs, Earpiece, 2 Implants 1 Crystal)
- Power – 9989 (R-2 Mods + 1 Crystal)
*Note – These stats are optimised for unscaled content – Nature of Progress (Dxun) Operation. All other PvE content is currently scaled with a hard cap on Endurance/Mastery and Power. Without optimising enhancements to get the most Power out of them, you will sit around 9300 power.
Left Side
- Earpiece & Implant
- Sha’Tek Adept Package MK-19
- Relics
- Uncapped – Serendipitous Assault & Focused Retribution
- Capped – Devastating Vengeance & Primeval Fatesealer
Utilities
Skillful
- Sith Defiance – 3% Damage Reduction (Always Take)
- Empty Body – 5% Healing Received (Doesn’t affect stolen life) (Always Take)
- Tempest Mastery – 25% increase on Force Storm (Situational)
- Corrupted Flesh – 15% Damage Reduction on Periodic Damage (Situational)
- Torturous Tactics – Reduces Electrocute cooldown by 10 sec. When Electrocute wears off, the target deals 25% less damage for 10 sec. (Situational)
In most cases, Sith Defiance, Empty Body and Tempest Mastery are the utilities you want. Only take Corrupted Flesh when there is uncleansable periodic damage like Tyrans with Affliction or Red Venom for Apex Vanguard. In relation to Apex Vanguard, specifically for NiM, depending on your job in relation to the theft droids, you will want to take 4 utilities in Skillful. In regards to Torturous Tactics, this utility is very underrated and highly useful in certain situations. The utility is good for Brontes, on the orbs to take significantly less damage without using the traditional Cloud Mind/Unnatural Preservation combo or even bubble. In Dxun, using your stun on strategic targets like Thrasher’s, Shadow Walkers, and Hunters will help your team take significantly less damage.
Masterful
- Surging Speed – Reduces the cooldown of Force Speed by 5 secs, Force Slow by 3, Force Barrier by 30secs. Force Speed lasts 0.5 secs longer, Polarity Shift increased movement speed by 100% while active, active cooldown on Force Speed finished when Force Barrier ends. (Always Take)
- Suppression – 25% Damage Reduction on Cloud Mind (Situational)
- Dark Resilience – Unnatural Preservation heals 30% more. Extrication increase target’s damage reduction by 25% for 6 sec.(Situational)
- Lightning Barrier – Your Static Barrier crackles with electricity, shocking attackers with x energy damage when it absorbs direct damage to you. Does not affect allies and cannot occur more than once each second (Situational)
- Electric Bindings – Overload binds its targets in electricity, immobilising them for 5secs. Direct Damage after 2 secs ends the effect prematurely. Swap with Lightning Barrier when needed(Situational)
- Haunted Dreams – Whirlwind activates instantly. If your Whirlwind breaks early from damage, the target is stunned for 2 sec.(Situational)
The Masterful utilities for Sorcerer are almost always situational and will be interchangeable depending on the fight. Surging Speed is the only utility that you should take in every fight, and that simply due to the CDR on Force Speed which synergises quite well with Gathering Storm. 8 times out of 10, you’ll take Surging Speed, Suppression and Dark Resilience. On the few fights Lightning Barrier is good for, you swap out Dark Resilience for it. For Styrak, you take Electric Bindings instead of either. Only in NiM Dxun does your utilities in Masterful change quite frequently between the fights. For Red and Mutant Trandoshans, Lightning Barrier can be a 1k dps increase, in Encounters 1 & 2 both Electric Bindings and Haunted Dreams are very useful. Depending on your role for Huntmaster, Haunted Dreams is a must take and for Apex Vanguard as stated earlier in Skillful, you might only take 2 utilities in Masterful.
Heroic
- Force Mobility – Thundering Blast, Force Leach and Innervate may be activated while moving. (Always Take)
- Shapeless Spirt – Reduces all damage taken while stunned by 30%. Additionally, reduces damage taken from area effects by 30% (Always Take)
- Unnatural Vigor – Unnatural Preservation increases your damage reduction by 15% for 6 secs. Additionally, reduces the cooldown of Unnatural Preservation by 5 secs. (Situational)
- Emersion – Force Speed grants Emersion, removing all movement-impairing effects and granting immunity to them for the duration. Swap with Unnatural Vigor when needed. (Situational)
Fairly straightforward, Emersion is a very situational utility, in the fights that you need it swap with Unnatural Vigor.
Standard Utility Setup

Passives and Abilities
Passives
 | Madness – Lvl 12 Force Lightning no longer has a cooldown. In addition, your Resurgence increases your armor rating by 30% while it heals you. |
| Sith Efficacy – Lvl 16 Reduces the pushback suffered while activating Force Leech by 75% and Force Lightning by 100%. In addition, each time your Force Lightning deals damage, you recover 2% of your total Force. | |
| Deathmark – Lvl 20 Death Field places a deathmark on affected targets, increasing the amount of damage the targets suffer from your next 15 periodic damaging abilities by 15%. Lasts 30 seconds. | |
| Wrath – Lvl 24 Dealing damage with Force Lightning produces a stack of Wrath. At 4 stacks, Wrath causes your next Lightning Strike, Crushing Darkness, or Demolish to activate instantly, consume 50% less Force, and deal 25% more damage. | |
| Pestilence – Lvl 28 Death Field spreads your Affliction and Creeping Terror to the targets it damages, as long as it damages targets already affected by your Affliction and Creeping Terror. In addition, Death Field overwhelms its targets for 45 seconds. Overwhelmed targets take 10% more damage from area attacks | |
| Disintegration – Lvl 32 Increases the critical chance of Force Lightning and Lightning Strike by 15%. | |
| Force Horrors – Lvl 36 Increases all periodic damage dealt by 15%. | |
 | Lightning Burns – Lvl 40 Damage dealt by Force Lightning has a 20% chance and damage dealt by Force Leech has a 60% chance to restore 2 Force and deal x energy damage to the target. |
 | Lingering Nightmares – Lvl 44 Increases the duration of Crushing Darkness and Demolish by 3 seconds |
| Creeping Death – Lvl 48 Increases the damage dealt by periodic effects by 15% on targets below 30% max health. In addition, Force Leach restores 15 force when used on a target affected by your Deathmark, | |
| Parasitism – Lvl 52 Increases the life stolen by Death Field and Force Leach by 100% and causes Affliction and Creeping Terror to steal life from enemy targets, healing you for 10% of the damage they deal | |
| Lightning Barrage – Lvl 56 Force Lightning channels and ticks 33% faster but deals 25% less damage | |
| Devour – Lvl 60 Force Leach deals 30% more damage when used on a target affected by your Affliction. In addition, each time a charge of your Deathmark is consumed, you gain 2 force | |
| Fulminating Current – Lvl 64 Dealing damage with Force Lightning increases the critical chance of your damaging periodic effects by 3% for 10 seconds. Stacks up to 4 times. | |
| Dark Echo – Lvl 68 Targets hit by Death Field have a 50% chance to emit a Dark Echo, damaging itself and up to 7 targets within 5 meters for x internal damage. |
Abilities
Rotational Abilities
 | Affliction – Force 32 – Range 30m Casts a powerful Force affliction upon the target that deals x internal damage over 18 sec. |
| Creeping Terror – Force 16 – Range 30s Paralyzes the target in fear, dealing x internal damage over 18 seconds and immobilizing it for 2 seconds. The immobilizing effect cannot occur more than once every 9 seconds. | |
 | Death Field – Force 45 – Range 30m – Cooldown 15secs Creates a death field at the target location dealing x – x internal damage and stealing life from affected targets to heal you for 10% of the damage dealt. Strikes up to 8 targets with a 5-meter radius. |
 | Demolish – Force 27 – Range 30s – Cooldown 15s – Activation 2s Crushes the target with devastating force, dealing x – x kinetic damage initially, plus an additional x kinetic damage over 9 seconds. The target also becomes Vulnerable for 45 seconds, increasing the damage taken from Force attacks by 5%. Replaces Crushing Darkness. |
| Force Leach – Force 45 – Range 30m – Cooldown 12s – Activation 1.50s Steals life from an enemy, dealing x – x internal damage to the target and healing you for 50% of the damage dealt. | |
| Force Lightning – Range 30m – Channeled 2.01s Deals x energy damage to the target and consumes 40 Force over the duration of the channel. Also slows the movement speed of the target by 50% and immobilizes weak and standard enemies. | |
| Lightning Strike – Force 36 – Range 30m – Activation 1.50s Fires a charge of lightning at the target, deals x – x energy damage. |
Non-Rotational Abilities
 | Expunge – Range: 30m – Force: 14 – Cooldown: 12s Cleanses a friendly target of up to 2 negative mental or Force effects. |
| Phase Walk – Activation 0.5s Cooldown 1.5mins Activating this ability marks your current location for 10 minutes. When this ability is activated again, if you are within 60 meters of the marked location, you instantly return to the marked location. Phasewalk goes on cooldown for 60 seconds when used to return to the marked location. | |
| Dark Heal – Range: 30m – Activation: 1.5s – Force: 63 Heals a friendly target for x – x health. | |
| Force Storm – Range: 30m – Channeled 3s Calls down a Force Storm over the target area, consuming 60 Force and dealing X energy damage to up to 8 targets within 8 meters over the duration of the channel. Standard and weak targets have a 33% chance to be stunned by the storm each second. | |
 | Reanimation – Range: 30m – Activation: 1.5s – Force: 27 – Cooldown: 5 minutes Revives an incapacitated ally. This ability is usable while in combat. When used, all group members can neither use nor be the target of an in-combat revival for the next 5 minutes. |
 | Shock – Range: 30m – Force: 36 – Cooldown: 6s Shocks the target for x – x energy damage. Standard and weak targets are additionally stunned for 3 seconds. |
 | Force Slow – Range 30m – Force – 9 – Cooldown 9s Deals x – x kinetic damage and slows the target’s movement speed by 50% for 6 seconds. |
 | Extrication – Range: 30m – Force: 27 – Cooldown: 1 min Lowers the target’s threat by a moderate amount and, if the target is a group member, pulls the target to your location. |
 | Volt Rush – Range 30m – Force 45 – Cooldown 10s Deals x – x energy damage to your target and energizes you for up to 5 seconds. The Energize effect can stack twice, with each stack increasing Volt Rush damage by 30%. The ability has 3 charges and recharge timer of 10 seconds. |
Offensive and Defensive Cooldowns
 | Cloud Mind – Cooldown 45s Wipe your enemies thoughts, instantly lowering your threat by a moderate amount Grants 25% damage reduction for 6 secs with Suppression utility. |
| Unnatural Preservation – Cooldown 25s Immediately restores x – x health to you. Cannot be used on others Grants 15% damage reduction and lessens cooldown by 5 secs with Unnatural Vigor utility. | |
 | Force Speed – Cooldown 15s Increases movement speed by 150% for 2.5 seconds. Does not break Stealth. Gathering Storm 4 piece – 20% more damage on next direct Force attack (Stacks with Polarity Shift effect). |
 | Polarity Shift – Cooldown 2mins Your connection to the Force shifts, granting 20% alacrity and immunity to pushback and interrupts for 10seconds. Gathering Storm 4 piece – Force attacks deal 20% more damage while Polarity Shift is active (Stacks with Force Speed effect). |
| Force Barrier – Channeled 8s – Cooldown 2mins 30s Projects a Force Barrier around you, granting immunity to all control, damage, and negative effects while channeled. This ability does not respect the global cooldown and can be used while controlled. While you are protected by Force Barrier charges will build up and grant you Enduring Bastion, a shield that absorbs an amount of damage based off the charges that are present when Force Barrier ends. Enduring Bastion also grants immunity to interrupts. | |
| Advanced Kyrpax Attack Adrenal – Cooldown 3mins Increases Power by 1005 and reduces all healing done by 20%. Lasts 15 seconds. | |
| Static Barrier – Force 41 – Range 30m Surrounds the target in a lightning shield that lasts 30 seconds and absorbs a high amount of damage. The target becomes deionized and cannot benefit from Static Barrier again for 20 seconds. | |
 | Recklessness – Cooldown 1min 30secs Grants 2 charges of Recklessness, which increases the Force critical chance of your direct attacks and heals by 60%. Each time a direct Force ability critically hits or a channeled Force ability is activated, 1 charge is consumed. Lasts 20 seconds. |
 | Unlimited Power – Force 45 – Cooldown 5mins Increases mastery, endurance and presences for you and your Operation group members within 40 meters by 10%. Lasts 10 seconds. |
| Resurgence – Range: 30m – Force: 45 – Cooldown: 6s Immediately heals the target for X-X, plus an additional X over 9 seconds. Resurgence increases your armor rating by 30% while it heals you. |
Rotation
Opening Rotation

Precast Demolish + Force Speed > Polarity Shift + Creeping Terror > Recklessness +Affliction > Adrenal + Raid Buff + Death Field >Force Leach > Force Lightning > Lightning Strike > Force Lightning > Force Lightning (clipped 0.2sec remaining) > Demolish.
Basic Rotation

Demolish > Creeping Terror > Affliction > Death Field > Force Leach > Force Lightning > Lightning Strike > Force Lightning > Force Lightning (clipped 0.2 s remaining) > Demolish.
The basic rotation for Madness is still basically the same as it was in 5.0, just with a lessened gcd from 1.3 to 1. 4. Using the Tempest of Rho tactical will ensure you get the most damage out of this rotation
The expanded rotation for Madness, just got a whole lot of fun with the new set – Gathering Storm. As stated earlier the Gathering Storm set, makes the next direct force attack deals 20% more damage after using Force Speed. Also, whilst Polarity Shift is active, you deal 20% more damage with Force attacks. So, before your heavy hitters Death Field and Force Leach, you would want to pop your Force Speed and Polarity Shift, adding Recklessness, Adrenal and your raid buff if applicable will ensure that Death Field and Force Leach deal a lot of damage.
Rotationally, you will want to use Force Speed after Death Field, so it proc’s on Force Leach, as Force Leach will deal more damage than Death Field. Force Speed can be used for Death Field, but I would recommend it only when hitting 4 or more targets. Recklessness should always be used on Death Field and Force Leach. Adrenal after applying Dots and before Death Field.
For fights such as Dread Council in Dread Palace or Mutant Trandoshans in Nature of Progress (Dxun) and you are kiting Raptus or Graeus respectively, you will want to stay on the move, only stopping to cast 1 Force Lightning – optimal times may change per kiting patterns, while the bosses are channelling an ability is a good time, after moving out of the way of course. All other abilities in Madness can be cast whilst on the move.
AoE Rotation
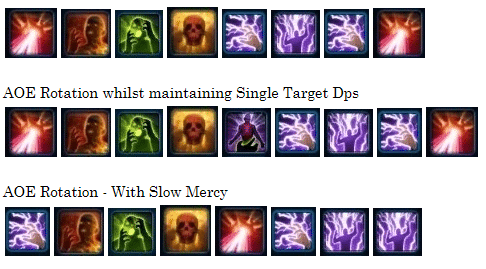
The key thing for the AoE Madness rotation is that you want to maintain your 4 stacks of Fulminating Current as it will maintain the crit chance on your periodic abilities. When using Slow Mercy, you want to make sure you use Demolish after Death Field, so you spread all your dots and debuffs to each target. If you Fulminating Current stacks are about to drop, throw in a quick clipped Force Lightning to maintain the stacks, and spam Force Storm. An important thing to note, Force Storm will only deal the extra 15% damage as long as your targets are affected by Death Mark, so once Death Mark drops, Force Lightning to regain the 4 Wrath stacks for proc’d Demolish and continue the rotation.
Slow Mercy Tactical
Not all fights are suited to run Slow Mercy. In the second and third boss fights in Dxun both SM and HM are prime candidates for Slow Mercy usage. In the old content, there are a couple of fights where Slow Mercy can be used.
Disclaimer – This is by no means a recommendation to run Slow Mercy on these rights, in all cases Tempest of Rho will give you higher DPS. For Slow Mercy to truly shine, you need Demolish to last on the targets, and get a use out of Force Storm. Out of all the fights listed – Grob’Thok, Corruptor Zero, and Calphayus, for Calphayus though, you will be significantly weaker during the first phase against the Defiler, so only take Slow Mercy if you are very confident. In Dxun, Encounter 2 in all modes and Huntmaster in NiM are the best for Slow Mercy.
- SnV
- Dash’Rode
- Thrasher
- Cartel Warlord’s
- Temple of Sacrifice
- Revanite Commanders
- Terror from Beyond
- Writhing Horror
- Dread Guards
- Dread Fortress
- Gate Commander Draxus
- Brob-Thok
- Corruptor Zero
- Dread Palace
- Bestia
- Calphayus (starting right side only)
- Ravagers
- Sparky
Sample Parse
Here is a link to a sample parse. This is by no means a perfect parse, nor am I in full BiS gear. The parse was done with no guild perks.
About Me
Hi, I am Potter, APAC NiM raider, Guildmaster and co-founder of Tauntaun War Veterans on Satele Shan. I’ve been playing the game on and off since Beta, taking a few large breaks in between. I returned to the game in October 2018, and practised for a long time to get into Hard Mode raids and then Nightmare (Master Mode) raiding in late February 2019. As of writing this guide, I am 26/26 with timed with 16m achievements, 3 of 5 in Nightmare Gods of the Machine, and 5 of 6 in Nightmare Nature of Progress (Dxun). If you have any questions you can reach on Discord – https://discord.gg/es2d2pc – Potter#8669, or on Twitch – https://www.twitch.tv/pottypotter.
Special thanks to all the people that helped me write and edit this guide, and bounce ideas off. Your help has been invaluable.


So, a static rotation like you suggest is great and all, but… Madness is even better when use use a IFTTT rotation as you can pump higher DPS if you never delay Force Leeching, the exception being delaying to reapply affliction if it fell off early. Also, Force Leech should always be before Death Field when using recklessness as Death Field will consume both charges of Recklessness if Death Field hits 2+ targets. the IFTTT rotation has been the optimal way to master Madness since Force Leech was added to the game. Yes it does make Madness play and feel “wonky” at times, but… it is the ideal. Cheers!!