
Are you new to PvP healing in Star Wars The Old Republic or are you looking to improve your healing output? Well, I’m here to help! Here is my SWTOR PvP Healing Tips and Tricks Guide.
This guide is up to date for Game Update 7.2 (December 2022).
Contents
- 1. Thoroughly read through all your ability tooltips including passives
- 2. Focus on Healing and Managing your Resources
- 3. Get familiar with your Defensive Cooldowns and your Utility Abilities
- 4. Practice positioning, LoSing (line of sight), kiting and general movement
- 5. Cleansing
- 6. Prioritise who you Heal
- 7. Your Performance is partially dependent on your team member’s capabilities
- 8. Practice! Practice! Practice! Don’t give up!
- More Healing Guides
1. Thoroughly read through all your ability tooltips including passives
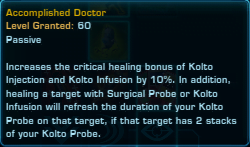
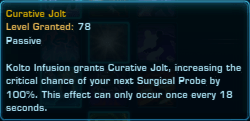
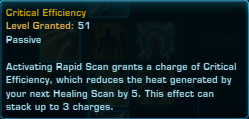
Understand what you’re different healing abilities do and how much resources they cost. Your passives will inform how you use your abilities. They can be found in your Combat Style Tree. Here are some examples of passives for each healing class.
Operative Healing Passives

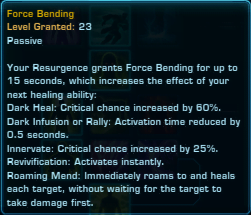
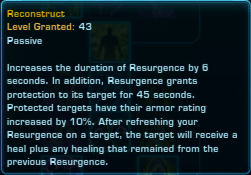
Sorcerer Healing Passives

Mercenary Healing Passives

2. Focus on Healing and Managing your Resources
When you’re starting out in PvP just focus on healing your teammates and not running out of resources. Don’t worry about anything else. Healing takes practice. Being able to predict who is going to take damage, how much damage they’re going to take and judging the rate at which they are taking damage takes time and practice. Knowing which heals to use in what situation and who gets healing priority also takes time and practice.
No healing class has a rotation per se, it’s more of a priority list. For Operatives/Scoundrels and Mercenaries/Commandos, the most important thing is to make sure you are weaving in your free heal regularly (Kolto Shot/Med Shot, Diagnostic Scan). For Sorcerers/Sages, make sure you’re using Resurgence -> Innervate/Rejuvenate -> Healing Trance combo to proc your Consuming Darkness/Vindicate to not give you the weary buff (Force Surge/Resplendence Passive) for better resource regen.
3. Get familiar with your Defensive Cooldowns and your Utility Abilities
Now that you have a decent grasp of healing, practise utilising your defensive cooldowns and utilities more efficiently. Read through the tooltips of all your defensive and utilities to ensure optimal use of these abilities.
Here are a couple of quick definitions.
- CC (Mezz, Soft Stun) – Crowd control ability that prevents you from doing anything for 6-8 seconds. Taking damage ends the effect.
Here are lists for each healing class of most of their important utility abilities.
Sorcerer/Sage
| Ability Name | Ability Type | Description/Use | |
|---|---|---|---|
| Static Barrier / Force Armour | Defensive | Absorbs a small amount of damage. | |
| Cloud Mind | Defensive | Increases damage reduction by 25% for 6 seconds. | |
| Force Barrier | Defensive | Full immunity to damage and all negative effects for 8 seconds. Builds charges that absorb small amounts of damage. | |
| Force Speed | Utility | Increase movement speed by 150% for 2 seconds. | |
| Overload / Force Wave | Knockback | Knocks back enemy players and snares them for 5 seconds. | |
| Polarity Shift / Mental Alacrity | Buff | Grants 20% alacrity and immunity to pushback and interrupts for 15 seconds. | |
| Recklessness / Force Potency | Buff | Grants two charges which increace Force Critical chance of direct heals by 60%. | |
| Phase Walk | Teleport | Mark a location. When you click the ability again and are within 60 meters, you return to the marked location. | |
| Whirlwind | CC | Traps the target in a whirlwind for 8 seconds. Damage to target ends this effect early. |
Operative/Scoundrel
| Ability Name | Ability Type | Description/Use | |
|---|---|---|---|
| Shield Probe / Defense Screen | Defensive | Absorbs x amount of damage. | |
| Evasion/Dodge | Defensive | Increase change to dodge melee and ranged attacks by 200% for 6 seconds. | |
| Cloaking Screen / Disappearing Act | Emergency Stealth | Enter strealth while in combat and purge all hostile removable effects. | |
| Exfiltrate / Scamper | Mobility | Roll forward 12 meters. Increases chance to dodge melee and ranged attacks by 30%. Has two charges, each charge recharess ocne every 8 seconds. | |
| Holotraverse / Trick Move | Teleport | Teleport to a friendly target or enemy and increases movement speed by 75% for 3 seconds. Purges movement impairing effects and can be used while immobilised. | |
| Flash Bang/Grenade | CC | AoE CC that lasts 8 seconds. When it ends, it reduces targets accuracy by 20% for 8 seconds. | |
| Sleep Dart / Tranquilizer | Stealth CC | CC target for 8 seconds. Only usuable from stealth and on targets not in combat. |
Mercenary/Commando
| Ability Name | Ability Type | Description/Use | |
|---|---|---|---|
| Kolto Overload / Adrenaline Rush | Defensive | Restores certain percentage of health when below certain percentage of health. | |
| Energy/Reactive Shield | Defensive | 25% Damage Reduction for 12 seconds. | |
| Responsive Safeguards / Echoing Deterrence | Defensive | Absorbs all single target damage and reflects 50% back to attacker. | |
| Chaff Flare / Diversion | Defensive | Melee and ranged defense chance increased to 35%. Interrupt Immunity. 2 Decoy charges absorb one force or tech attack each. | |
| Rocket Out / Propulsion Round | Mobility | Move backwards rapidly. Has two charges. | |
| Hydraulic Overrides / Hold the Line | Mobility | Increases movement speed by 30% and gives immunity to movement-impairing effects for 10 seconds. | |
| Electro Net | Slow/Ensnare | Reduces movement speed by 50% and prevents use of high mobility actions. | |
| Power Surge / Tech Overrride | Buff | Next ability used within 15-seconds with an activation time activates instantly. | |
| Concussion Missile/Charge | CC | Knocks out target for 8 seconds. Damage to target ends this effect early. |
4. Practice positioning, LoSing (line of sight), kiting and general movement
Here are some quick definitions.
- Kite – running away from your attacker or attackers to make them chase after you. You can kite attackers to your teammates or around objects or terrain in the landscape to give yourself some protection or breathing room.
- LoS – When you ‘line of sight’ incoming damage (good) or friendly player healing (bad) using the terrain of the map or an object in the landscape.
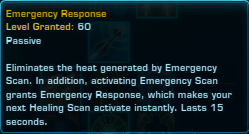
As a healer, you have to watch your positioning. Try to move around regularly and place yourself near objects that can provide LoS opportunities.
Backpedalling
DO NOT BACK PEDDLE. Your character moves slower when moving backwards (S key). Therefore it is always important to move forward or sideways away from your attacker. The easiest way to get out of the habit of back peddling is to unbind your S key.
Keyboard Turning
Keyboard turning (using the A and D keys to move) will also make you move slower. So make sure you practice mouse turning. You can turn your character with your mouse by holding down the right mouse button and moving your mouse in the direction you want to go.
5. Cleansing
Cleansing is a very useful tool in a healer’s arsenal that allows us to cleanse negative effects such as CC’s, slows and snares in PvP. However, there are currently restrictions on what can be cleansed based on ability type. In short, Operatives and Mercenaries can cleanse Tech, Physical and Mental effects and Sorcerers can cleanse, Force and Mental effects.
The most common things to cleanse are going to be CC’s. Here’s a table of which healing class can cleanse what.
| Class | Ability | Effect Type | Raid Frame Icon |
|---|---|---|---|
| Mercenary/Commando, Operative/Scoundrel | Flashbang / Flash Grenade | Tech | |
| Sorcerer/Sage | Whirlwind / Force Lift | Force | |
| All | Intimidating Roar / Awe | Mental (Physical) | |
| Concussion Missile / Charge | Mental (Tech) | ||
| Sleep Dart / Tranquilizer | Mental (Tech) | ||
| Mind Trap / Mind Maze | Mental (Force) |
When it comes to cleansing other types of abilities I would recommend just cleansing slows and snares on yourself (if you can).
6. Prioritise who you Heal
You will not be able to keep everyone on your team alive. So you should get into the habit of picking and prioritising who you heal. Here’s a rough priority list.
- Yourself
- Tank (guarding you)
- Other healers
- Good DPS players
The majority of the time, it’s best not to waste your resources trying to keep someone up who is at low health, especially if they are squishy (an exception to this would be the tank guarding you).
7. Your Performance is partially dependent on your team member’s capabilities
You can be doing everything you’re supposed to be doing as a healer perfectly. But if your teammates aren’t doing their part, your performance is going to suffer and you’re going to have a hard time staying alive. What decides the outcome of a match more often than not is DPS output.
The higher the DPS capability of your teammates and their ability to focus targets together, the better your chances of succeeding are. In turn, the enemy team will put less pressure on you since they’ll be fighting for their lives.
8. Practice! Practice! Practice! Don’t give up!
Keep at it. You’re going to have good matches and bad ones. PvP a lot. Don’t get discouraged by yourself or anyone else. Have patience with yourself. Keep at it and you will get better!
If you have any questions or feedback please do let me know. I am always happy to help!
More Healing Guides
- Mercenary Healing Guide
- Commando Healing Guide
- Sorcerer Healing Guide – coming soon!

I love this guide and just recommended it to numerous blossoming healers I know.
I have one critique. The image you used for “part 4 Practice Positioning” though it makes the point of LOSing, is a bad example of it. Teams that fight at their spawn, die and lose at their spawn. Unless, a player is strategically kiting numerous enemy players away from an objective.
In that situation, should be fighting at the enemy spawn, but even if they’re fighting at their spawn, it would be ok if there were more enemies there. But with you, it is 3 v 3 at your spawn. They didn’t need your heals there. You were probably needed at snow more than at spawn, while can keep 3 of them busy against 2. The enemy is effectively guarding their node, and your side is making no advantageous ground.
I see two of your teammates at snow and 2 at grass. With you, it would be 1 more to help take a node at either snow or grass while you let farm their “numbers” which we both know aren’t important, yet keeping 3 enemies busy, overstretching the enemy’s resources.
The important numbers and only numbers that count for that map is the close to 200 points more the enemy team has over yours.
Hopefully you and Legalize Tuggies ended up leaving spawn towards a node, as Donkeybeater kept 3 of them busy, and not Tuggies exposing your position, LOL!
Anyhow, every sentence in your guide is obviously spot on, and I extremely recommend every healer to study it. I really enjoyed reading this.
The post deleted the parts where I mentioned the “make pvp great again” guild, probably because I put it between brackets.