Here is my guide on how to obtain Legendary Implants in Star Wars The Old Republic. This guide goes through step-by-step what you need to do to get Legendary Implants, which are the new Set Bonus items, in SWTOR.
Set Bonuses in SWTOR are now on Implants and are called Legendary Items or Legendary Implants. Obtaining these Legendary Implants is fairly straightforward. Legendary Implants and their upgrades will be purchasable from a vendor. But first, you need to complete a Mission to gain access to this vendor.
Technological Advancements Mission
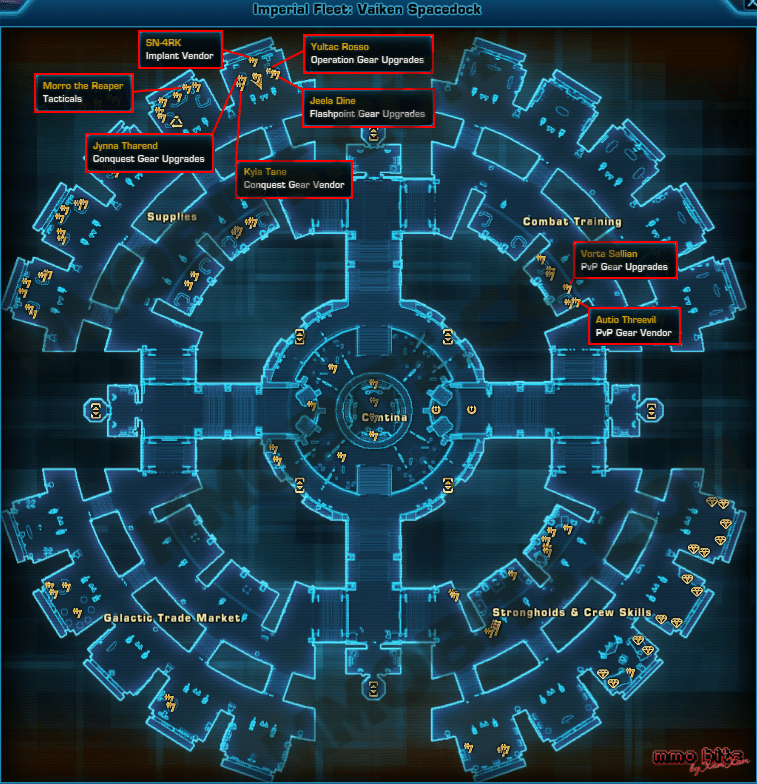
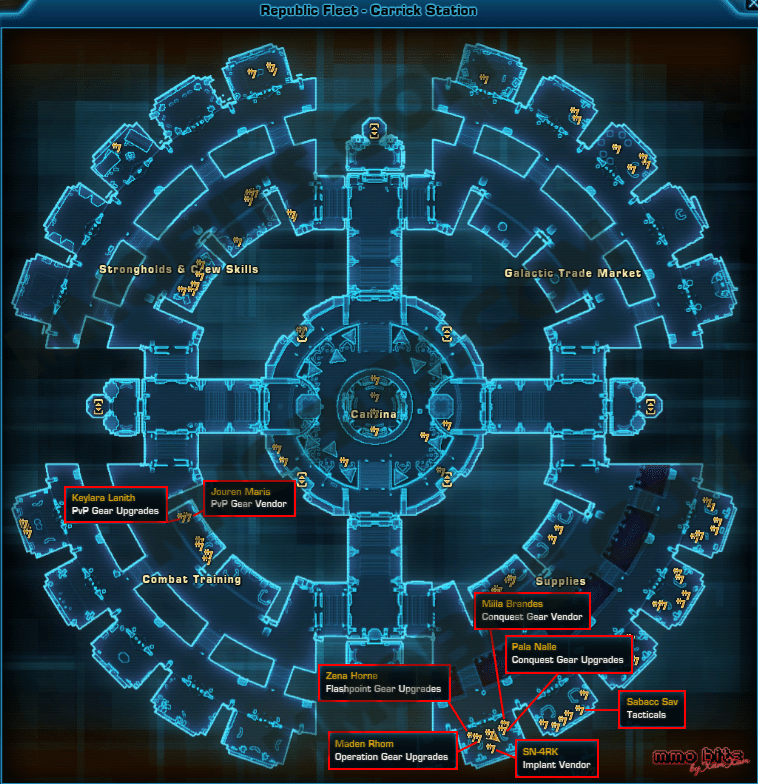
As soon as you are level 80, speak to Lonndar Eadwinn on your Factions Fleet to get the Technological Advancements Mission. They can be found in the Supplies Section of your Factions Fleet near the other 7.0 Gear Vendors (next to <SN-4RK> on the maps below).
Imperial Fleet
Republic Fleet
You will then have to wait for around 30-seconds, then speak to Lonndar again when it prompts you that you can. Once you finish speaking to them, again, you will have the mission.
All you have to do is complete any of the various activities listed to charge a Neuro-Key. You can do any combination of the following activities to earn 100 points (charges):
Activity
Charge
Personal Conquest
34
Flashpoints or Operations via Groupfinder
2
Story Flashpoints
2
Veteran Flashpoints
6
Master Flashpoints
10
Story Mode Operation Boss
4 per boss
Hard Mode/Veteran Operation Boss
7 per boss
Nightmare/ Master Operation Boss
8 per boss
Warzone or Arena Match
10
Daily Area Weekly Mission
10
Heroic Weekly Mission
10
Once you earn 100 points, return to Lonndar and you will then gain access to the Implant Vendor <SN-4RK>.
Legendary Implant Cost
By default, the vendor will only show you Legendary Implants relevant to your class (Combat Style). You can choose to see all Legendary Implants. However, you can only purchase Legendary Implants useable on the base class you are on. This is because Legendary implants are base-class bound.
All Legendary Implants (Set Bonuses) and their upgrades all cost exactly the same. The only difference is when you’re upgrading a Legendary Implant, you will have to turn in the current tier you have (more on this below).
Note: reduced cost due to Achievement (see below).
60 Conquest Commendation
6,500 Tech Fragmentations
25,000 Credits
The currencies to purchase Legendary Implants can be earned from the following activities. You can find out more about how to earn these currencies in my Game Update 7.0 Gearing Guide.
Currency
Main Sources
Conquest Commendation
Personal Conquest Completion, Dailies & Heroics
Tech Fragments
Personal Conquest Completion, Dailies
Upgrading Legendary Implants
Legendary Items start at Item Rating 326 and go up to 340. You can upgrade them seven times, to 328, 330, 332, 334, 336, 338 and 340.
To upgrade Legendary Implants, all you have to do is go to the Set Bonus Vendor droid. Once you’ve bought a 326 Implant, you unlock the ability to purchase the 328 version from the vendor. Then the cycle continues until 340.
Note you do have to turn in the previous implant to get the next tier. So make sure you remove your augments first.
Legendary Implant Upgrade Costs
The cost to buy and upgrade your Implants initially is as follows.
60 Conquest Commendations
6,500 Tech Fragmentations
25,000 Credits
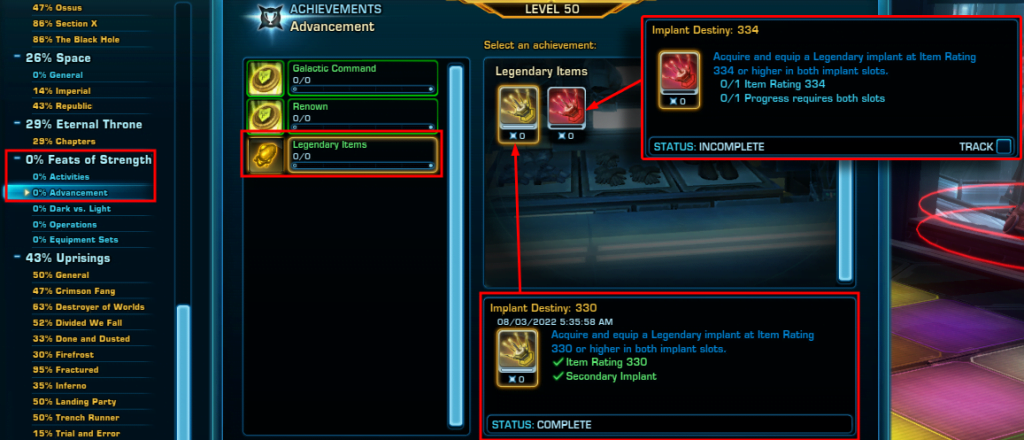
However, in Game Update 7.1, two achievements were added to the game that once achieved, reduce the cost of upgrading your implants. Implant Destiny: 330 and Implant Destiny: 334. These achievements can be found under Feats of Strength -> Advancement -> Legendary Items.
Once you have these achievements, it reduces the cost of upgrading your Legendary Implants across your entire Legacy. This is the new upgrade cost.
2,500 Tech Fragments
60 Conquest Commendations
25,000 Credits
If you only have the Implant Destiny: 330 Achievement, it will only reduce the cost of upgrading up to 330 Item Rating. Upgrading to 332 and above will still cost the normal amount.
Legendary Implants and Alts
As stated above, Legendary Implants are base-class bound. This does mean a Powertech can wear a Legendary Implant designed for a Mercenary (and vice versa). This can be beneficial to do temporarily while gearing up alts of the same base class as it will increase the item rating of those pieces. That way you won’t get any useless Implant upgrade pieces from Requisition Caches. To understand more about how gearing by Item Rating works, check out my Game Update 7.0 Gearing Guide.
Legendary Implant List
Here are tables of all the various Legendary Items listed by Base Class. Click on any Base Class below to see all the available Set Bonuses and their primary tertiary stat.
Be mindful of the tertiary stats when considering which Legendary Implant to buy for your Discipline. Also, Legendary Implants do not stack! This means you can not wear two of the same Legendary Implant.
Set Bonus
Stat
Description
Force Resistance
Absorb
Elemental, Internal, Kinetic and Energy damage reduction is increased by 3%.
Retaliator
Shield
Retaliation has no cooldown.
Champion’s Precision
Critical
Activating Enrage, Bloodrage, Threatening Rage grants Champion’s Precision, increasing your critical hit chance by 20% for 8 seconds.
Fearless Victor
Critical
Whenever you use a rage spending damage ability your melee damage is increased by 10% for 10 seconds.
Nimble Master
Alacrity
Activating Saber Ward grants Nimble Master increasing your movement speed by 100% for the duration of Saber Ward.
Vicious Thirst
Alacrity
Vicious Slash, Massacre, and Sweeping Slash add Vicious Thirst stacks to their targets, stacking up to 5 times. Killing an enemy with Vicious Thirst stacks increases your damage by 3% per stack for 10 seconds.
Berserker’s Call
Critical
Reduces the cooldown of Frenzy by 15 seconds. Additionally activating Berserk increases all damage dealt by 5% for 10 seconds.
Dispatcher
Alacrity
Activating Dual Saber Throw grants Dispatcher’s Challenge, making your next Vicious Throw or Vicious Slash critical hit, Critically hitting with a weapon attack generates 1 rage. This effect cannot occur more than once every 3 seconds.
Set Bonus
Stat
Description
Force Resistance
Shield
Elemental, Internal, Kinetic and Energy damage reduction is increased by 3%.
Ballast Point
Absorb
Deflection grants Ballistic Immunity for 6 seconds, giving you immunity to movement imparing effects, knockdowns, and physics.
Dynamic Force
Critical
The cooldown of Recklessness is reduced by 15 seconds.
Shadowcraft
Critical
Using Phantom Stride from stealth grants Shadowcraft, increasing your critical hit chance by 100% for 6 seconds. Force Cloak resets the cooldown of Phantom Stride.
Force Training
Alacrity
Melee and Force attacks deal 3% more damage.
Gathering Storm
Alacrity
Force Speed makes your next direct Force attack deal 20% more damage and Force attacks deal 20% more damage while Polarity Shift is active.
Unmatched Haste
Critical
The duration of Polarity Shift is increased by 5 seconds and using Force Speed reduces the active cooldown of Polarity Shift by 5 seconds.
Empowered Restorer
Alacrity
Activating Force Barrier puts a barrier on nearby allies, absorbing 21,834 damage for up to 8 seconds and granting them an additional 25% elemental damage reduction while active.
Revitalize
Critical
While Resurgence is active on a target, it has a 15% chance to spontaneously heal the target whenever the target receives non-Resurgence healing from you.
Set Bonus
Stat
Description
Active Reload
Alacrity
Killing an enemy with Takedown resets the cooldown of Takedown and increases your damage by 5%. This effect stacks up to 3 times and lasts 10 seconds.
Energy Regulators
Alacrity
You gain 1 energy per second while in cover.
Improved Targeting
Critical
Reduces the cooldown Laze Targeting, Viral Targeting, and Targeting Systems by 15 seconds.
Lock and Loaded
Alacrity
Ranged and Tech damage is increased by 5%.
Tactician
Alacrity
Gaining a Tactical Advantage increases your critical chance by 10% for 10 seconds. This effect can only occur once every 18 seconds.
Tactician Focus
Alacrity
Dealing critical damage with Veiled Strike or Lethal Strike grants Tactician’s Focus, making your next Laceration or Corrosive Assault critically hit. This effect can’t occur more than once every 30 seconds.
Trapper
Critical
Toxic Haze refunds a Tactical Advantage and it no longer costs energy.
Mini Shield
Absorb
Activating Shield Probe creates an absorb shield around each ally within 5 meters, lasting up to 10 seconds and absorbing 3331 damage.
Aggressive Treatment
Alacrity
Toxic Haze heals any allies standing inside it.
Field Medic
Critical
Activating a healing ability has a 15% chance to grant Field Medic’s Critical Bonus which causes your next Kolto Injection to be a critical. This effect can only occur once every 30 seconds.
Set Bonus
Stat
Description
Squad Leader
Absorb
Whenever you take damage with Energy Shield a weaker shield is applied to nearby allies for 3 seconds.
Supercommando
Shield
Activating Power Yield, Thermal Yield, or Energy Yield grants a shield that absorbs 1,620,465 damage. Lasts up to 3 seconds.
Mandalorian Armanents
Critical
When Shoulder Cannon is put on cooldown, it applies Autocannon to you for 60 seconds, firing a rocket at your current target whenever you deal direct damage. This additional rocket can fire once every 10 seconds.
Shock Trooper
Alacrity
Flaming Fist and Rocket Punch’s heat is reduced by 4. Flaming Fist, Magnetic Blast and Heat Blast increases damage dealt 10% for 15 seconds. Cannot occur more than once every 30 seconds.
Specialist
Critical
Explosive Fuel increases damage done by 20% while Ion Gas Cylinder is being utilized and increases damage reduction by 10% while Ion Gas Cylinder is not being utilized.
Veteran Ranger
Alacrity
Each Shoulder Cannon rocket has a 50% chance to trigger an additional rocket.
Advanced Scanning
Alacrity
Reduces the cooldown of Healing Scan by 1.5 seconds and the cooldown of Emergency Scan by 3 seconds.
Concentrated Fire
Critical
Activating Supercharged Gas makes your next Rail Shot, Mag Shot, or Emergance Scan critically hit or heal.
Random Charge
Alacrity
Damaging an enemy or healing an ally has a 10% chance to generate a stack of Supercharged. Cannot occur more than once every 5 seconds.
Target Eliminator
Critical
Heatseeker Missiles and Serated Shot increase damage dealt by 2% for 15 seconds. Cannot occur more than once every 30 seconds.
Thank you for reading this SWTOR guide! Let me know your thoughts in the comments below or on Social Media. And a special thank you to my Patrons and Twitch Subscribers for your continued support!