Combat Styles is the new reworked class system introduced to Star Wars The Old Republic in Game Update 7.0. I’ve put together an in-depth overview and guide of one of my favourite Combat Styles (Class) in SWTOR with a PvP focus, Sorcerer Corruption.
Happy to receive feedback on this guide, especially improvements or corrections. Quality feedback will be compensated!
Guide Updates
- 15 – 16 February 2024
- Updated PvP Basics Infographic for 7.4.
- Formatting Changes across all sections.
- Gearing Section updated for 7.4.
Sorcerer Corruption Healing for Beginners (PvP Basics)
Below is an infographic I put together designed for players new to the spec. Hopefully, it will help you get started with this combat style.

If you want to know more details about why I picked specific things or exact details on my gear loadout, read the corresponding sections via the contents menu above.
Introduction
The Sorcerer Corruption Combat Style’s excellent single-target and AoE healing output, along with excellent mobility and utility, make it a fantastic all-rounder for beginners to learn how to heal in PvP.
In this guide, I do a deep dive into the new Ability Tree, talk about the new Legendary Implants (Set Bonus) options as well as Tacticals, cover Gearing and go over the Rotations and Priorities. I’ve also included a Build section that covers the different builds I use for those not interested in the nitty-gritty details. The guide concludes with a PvP Tips and Tricks section.
My goal with this guide is to give a foundational overview of the class and showcase the ins and outs that will be of benefit to beginners and more experienced players alike.
I’ve written this guide with more of a PvP slant (same with my Mercenary/Commando Healer Guides). I welcome any feedback from more experienced players!
Sorcerer Corruption Combat Style Overview
Mainhand – Lightsaber
Offhand – Focus
Resource – Force
Basic Healing Description – An all-around healer with some burst and decent AoE healing capabilities.
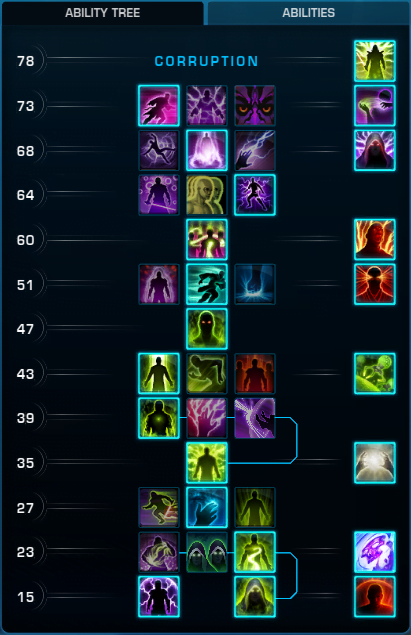
Here is what the new 7.0 Sorcerer Corruption Combat Style UI looks like. You can see the ability tree on the right side of the UI.
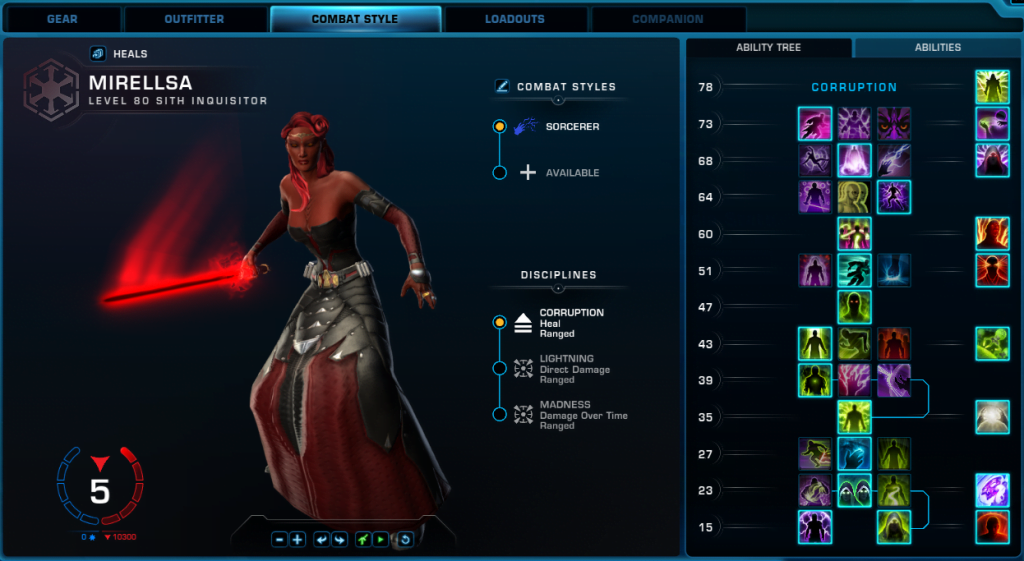
Here is a detailed overview of the Sorcerer Ability Tree – https://docs.google.com/spreadsheets/d/15_kn81heDFeCKPYvsJymvn8FGxovAmoUYqJt-6gtPeo/edit?usp=sharing
Key Abilities
Here are lists of all the key abilities you will use and should have on your Hotbar. Also includes some optional abilities.
Gearing and Stats
In this section of the guide, I go over bolster, gear and stats. if you are unfamiliar with how gearing works, I would encourage you to check out my Game Update 7.0 Gearing Guide (new guide coming soon) and my Game Update 7.1 Level 80 Item Modification Guide.
If you have only recently returned to the game, I would recommend gearing with modifications. It will be much faster.
PvP Gear and Stats
Now you have a couple of options here. Keep using the static/unmoddable Force Healer's gear or use Item Modifications.
It's only really beneficial to upgrade your static gear pieces to Item Rating 336 if you saved up your Weekly Crates prior to 7.4. It's much easier to use two 336 pieces to gain access to the modifications vendor. See my Game Update 7.1 Level 80 Item Modification Guide for details on how to get access to the Item Modification Vendor on your faction's Fleet.
As of Game Update 7.4, PvP bolster is now at Item Rating 336 and Augments still work. However, colour crystals still are not working (shrugs).
Remember Level Sync/Bolster will only start affecting your stats if you go above an overall rating of 336. In other words, it doesn't matter what the Item Rating of individual pieces/mods you have equipped are as long as your overall Item Rating is at 336. As long as your overall Item Rating is at 336, your stats will not get reduced. However, if your overall item Rating goes up to 337, then all your stats will get reduced by the bolster system to 336 Item Rating. This means you miss out on bonus stats.
You can make things easy for yourself and just stick with 336 mods/gear and wear your 340 Legendary Implants.
I would highly recommend going the moddable gear route so you can adjust your tertiary stats as needed.
BiS Item Rating Set-Up
The optimal Item Rating set-up for PvP currently is as follows.
- 336 Relics
- 340 Implants
- 336 Mainhand and Offhand
- 336 Rakata or Thyrsian Earpiece
- All Armour Pieces - 336
BiS Mods
These are the mods you should be using in your gear.
- Versatile Hilt (336)
- Versatile Armouring (336)
- Lethal Mod (336)
- Adept and Nimble Enhancements (336)
You do not need to worry about Mastery or Endurance. It is included by default on all of your Item Modifications. Your focus should be on getting your tertiary stats (Alacrity and Critical Rating) at the right thresholds.
| Stat | Descriptor | Raw Number |
|---|---|---|
| Alacrity | 1.4 GCD | 2,054 |
| Critical Rating | Diminishing Returns* | ~4,000 |
For PvPers, it won't be possible to get to a 1.3 GCD (5431) with current gear levels (remember Guild Perks don't apply in instanced PvP). You need to get to 1.4 (2054) then from there, you can increase your Alacrity until you feel comfortable. I would recommend going 200 over the threshold at the bare minimum but do not go above 2800.
As for Critical Rating, this is where you will put the rest of your stat budget. Around ~4000 diminishing returns supposedly set in. However, it is okay to go higher even up to 5000.
Relics
Focused Retribution is the first relic you should have. The second relic will depend on your Critical Rating. If you are below 4000 Critical Rating, you should use Devastating Vengeance. If your Critical Rating is above 4000, you should use Serendipitous Assault.
Augments
You can utilise three tiers of augments depending on your budget. If you can, at least get the Purple Level 75 Augments (that extra Power is too good to pass up). Gold Augments are extremely expensive and are not worth the effort unless you have billions of credits lying around.
Augment 45 - Level 68 [Purple]
- Advanced Critical Augment 45: +96 Critical Rating, +65 Endurance
- Advanced Alacrity Augment 45: +96 Alacrity Rating, +65 Endurance

Augment 74 - Level 75 [Purple]
- Advanced Critical Augment 74: +108 Critical Rating, +144 Power & Endurance
- Advanced Alacrity Augment 74: +108 Alacrity, +144 Power & Endurance

Augment 77 - Level 75 [Gold]
- Superior Critical Augment 77: +130 Critical Rating, +171 Power, +171 Endurance
- Superior Alacrity Augment 77: +130 Alacrity, +171 Power, +171 Endurance

The following Crew Skills can craft Augments.
- Armourmech - Alacrity Augment 74 & 77
- Synthweaving - Critical Augment 45, 74, 77 & Alacrity Augment 45
Legendary Implants (Set Bonuses)
Set Bonuses have been moved to Implants in 7.0 and are now called Legendary implants. You can read more about how to obtain the new Legendary Implants in my Legendary Implants Guide.
Here is a list of all the relevant Corruption Legendary Implants. You will be able to have two different set bonuses equipped at a time. You can not stack two identical Legendary Implants.
| Name | Tertiary Stat | Description |
|---|---|---|
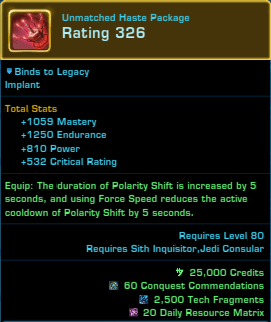
| Unmatched Haste | Critical | The duration of Polarity Shift is increased by 5 seconds, and using Force Speed reduces the active cooldown of Polarity Shift by 5 seconds. |
| Dynamic Force | Critical | The cooldown of Recklessness is reduced by 15 seconds. |
| Empowered Restorer | Alacrity | Activating Force Barrier puts a barrier on nearby allies, absorbing x damage for up to 8 seconds and granting them an additional 25% elemental damage reduction while active. |
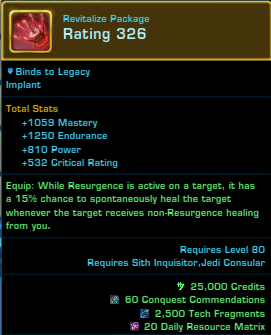
| Revitalise Package | Critical | While Resurgence is active on a target, it has a 15% chance to spontaneously heal the target whenever the target receives non-Resurgence healing from you. |
Details and Comments
- Unmatched Haste
- Polarity Shift increases your Alacrity by 20% and gives you immunity to pushback and interrupts. So adding an extra 5 seconds to the duration is very nice plus having a mechanism to reduce the cooldown further makes it an essential Implant for Sorcerer healers.
- Dynamic Force
- Recklessness increases the Critical chance of your next two force abilities by 60%. So reducing the cooldown of this buff is a solid choice for Sorcerer Healers.
- Revitalise Package
- A 15% chance to spontaneously heal really is not much of a chance when other Implants give you guaranteed benefits.
- Empowered Restorer
- Force Barrier has a 3-minute cooldown so this really isn't that useful in PvP compared to other Implants.
Tacticals
Tacticals have not changed from 6.0. However, some were removed from the game when 7.0 launched.
Here is a list of all the relevant Tacticals for Sorcerer Corruption in 7.0. All Tacticals can be purchased from Morro the Reaper on the Supplies section of Fleet for 3,000 Tech Fragments.
| Name | Description |
|---|---|
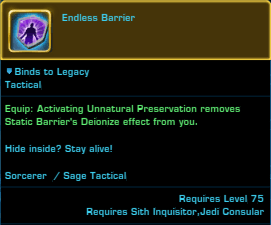
| Endless Barrier | Activating Unnatural Preservation removes Static Barrier's Deionise effect from you. |
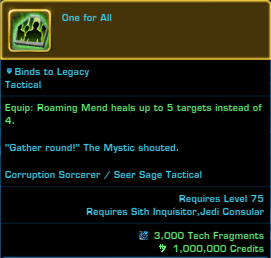
| One for All | Roaming Mend heals up to 5 targets instead of 4. |
| All for One | Revivication's pool concludes with a burst of dark Force energy, healing up to 8 allies within it for x - x health. |
| A Healing Hand | Extrication now heals you and the target and makes your next Resurgence free. |
Details and Comments
- Endless Barrier
- This Tactical makes it so that you can keep up Static Barrier on yourself more often by giving you means to remove the Deionise debuff via Unnatural Preservation. (Deionise prevents you from putting Static Barrier on yourself (and other players) for 15 seconds).
- One For All
- This adds one extra charge to Roaming Mend. It is the best of the healing-specific Tacticals even though it doesn't really do all that much.
- All for One
- The additional heal that this Tactical adds to the end of Revivification is minuscule. Not to mention that most people don't stay in the AoE for the full duration (cause they don't have to). Not worth it at all.
- A Healing Hand
- Think about how often you use Extrication and how long the cooldown is (~53 seconds). Do you think it's worth it compared to some other Tacticals?
Stims, Medpacs and Adrenals
The best Stim to use for Sorcerer Healers in PvP is the Versatile Stim.
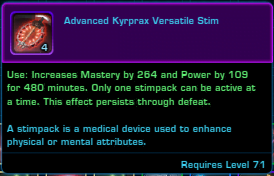
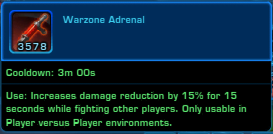
In PvP, you want to be using the Warzone Medpacs and Adrenals. You get these as a drop from your match completion crates. The Warzone Medpac does not restore a fixed amount of health. Instead, it restores 35% of your maximum health. The adrenal increases your Damage Reduction by 15% for 15 seconds. So use it as another defensive cooldown.
Rotations, Priorities and Buffs
Here are all the various rotations and priorities and important buffs. But first let's discuss our resource, Force.
Please note a lot of the hyperlinked tooltips used are not up-to-date for 7.0. I'm just using them for the ability icons.
Sorcerer Healers use Force as their resource. Using an ability costs Force. The more abilities that you use that cost Force, the lower your Force goes. Some abilities cost more Force than others.
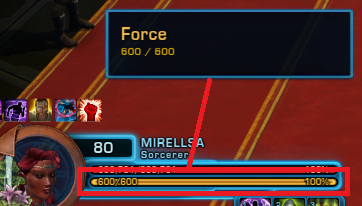
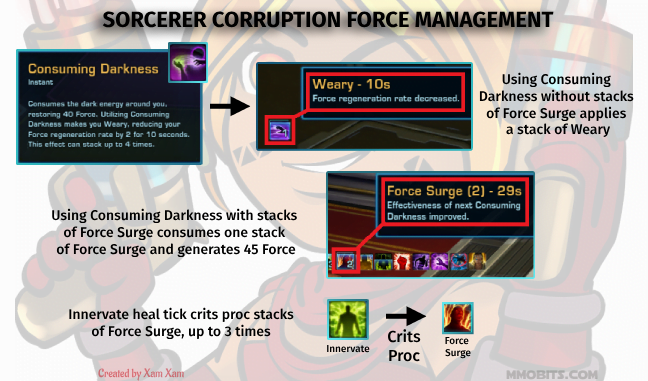
Sorcerer Healers do not have a free base heal. Instead, they use the ability 'Consuming Darkness' to manage their Force. When you use Conssuming Darkness, however, it leaves a debuff called Weary which reduces the rate you regenerate Force.
However, you can prevent this from happening thanks to the Force Surge Passive (Ability Tree Level 60). This passive makes it so that when Innervate critically heals, it grants charges of Power Surge (up to 3). Using Consuming Darkness while you have a Force Surge charge means you don't get the Weary debuff. Instead, you get the Reverse Corruption Buff which increases your Force regeneration rate.
Sorcerer Healers have priorities rather than a set rotation. This means that what abilities you use will depend on the situation. There are some pretty simple rules to follow once you understand how your healing abilities work together.
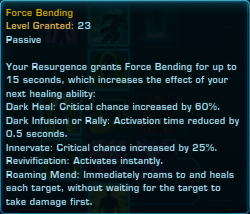
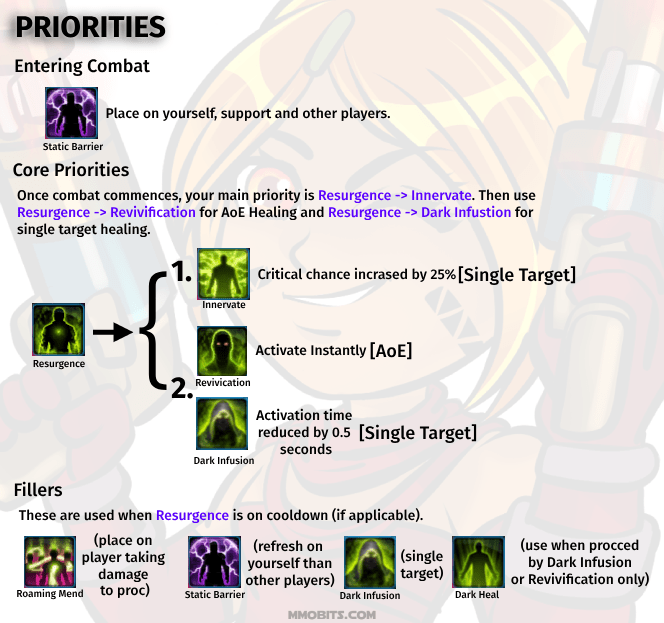
Your key healing ability is Resurgence. The Passive 'Force Bending' (Level 23 Ability Tree Passive) makes it so Resurgence uniquely procs all your other healing abilities. Some of these are more useful than others.
- Dark Heal - Critical chance increased by 60%.
- Dark Infusion/Rally - Activation time reduced by 0.5 seconds.
- Innervate - Critical chance increased by 25%.
- Revivification - Activates instantly.
- Roaming Mend - Immediately roams to and heals each target, without waiting for the target to take damage first.
Here is an overview of your healing priorities.
Key Things to Consider/Tips
- Keep in mind players do not have to stay in the Revivification circle. They only have to pass through it briefly to receive the healing effect (which acts as a HoT). Something to keep in mind when placing it.
- Reminder: use Resurgence -> Innervate + Consuming Darkness (with Force Surge Procs only, see above) off cooldown. This combo helps you to manage your Force.
- If you're using the Unmatched Haste Implant, keep in mind that using Force Speed reduces the cooldown of Polarity Shift by 5 seconds.
- You can click off Static Barrier early if you wish to strategically use your bubble stun or give yourself an extra heal.
- Roaming Mend will only heal a target once they take damage. So place it on targets highly likely to take damage ie. yourself, a tank or a melee DPS for maximum effect.
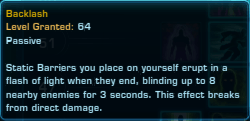
- Static Barrier - Absorbs a small amount of damage. Good for mitigating dot damage. If specced into Backlash (Level 64 Ability Tree), it also works as an AoE stun when the barrier finishes. You can use it strategically on a large group of enemy players or to give you a breather to LoS enemies around a pillar/wall.
- Cloud Mind - With its short cooldown Cloud Mind is one of your more reliable defensive abilities. It reduces damage taken by 25% and lasts 6 seconds. It's good to pop when getting hit by multiple enemies at once or to reduce your damage so you can focus on healing your teammates.
- Force Barrier - This defensive makes you completely immune to all effects including damage so can be used to
- Force Speed - This increases your movement speed for 2 seconds. Can be used to kit enemies to a LoS point or just to give you some breathing room.
- Phase Walk - Is used mainly to get away from enemies when low on health. It acts as a bonus cooldown, if well placed, to buy you enough time to heal yourself up before enemies find you.
- Recklessness - This increases the critical chance of your next two Force abilities by 60%. This should be used for burst healing scenarios and for guaranteeing two good heal crits when needing to heal multiple targets.
- Polarity Shift - Polarity Shift not only grants 20% alacrity but it also grants immunity to pushback and interrupts. It lasts for 15 seconds. This is great when you're under pressure and need to be able to keep healing. Although, you are still susceptible to stuns.
- Extrication - Use this to pull friendly players to safety who are at risk of dying. It's also very useful in Huttball to pull the ball carrier closer to the goal line or out of a trap.
Here is an overview of some of the key buffs that you can apply to yourself and other players. These tooltips help inform when and who to use your abilities on.
Buffs you can apply to yourself and other players
- Resurgence
- Protected - increases armour rating by 10% for 45 seconds (Reconstruct Passive).
- Roaming Mend
- Resistance - reduces internal and elemental damage by 3% for 45 seconds.
- Dark Heal
- Dark Concentration (Passive) - Dark Infusion and Revivification cause your next Dark Heal to activate instantly, consume no Force and heal for 60% more. This effect cannot occur more than once every 10 seconds.
- Static Barrier
- Sustaining Barrier (Passive) - Static Barrier grants 10 charges of Sustaining Darkness. Targets will lose a charge of it each time you directly heal them. If Static Barrier concludes early, the target is healed for x health per remaining charge.
Cleansing is an important part of being a competent PvP healer. In instanced PvP environments, only effects that impede or hinder players (such as CC's, Slows, Snares etc.) can be cleansed. Dots that do damage can not be cleansed. Sorcerer Corruption Healers can cleanse Force, Physical and Mental Effects.
The Sorcerer Cleansing Ability is: Expunge
Here are some examples of some of the effects we can cleanse. The Icon pictured is how the debuff will look on the Operations Frame (not a comprehensive list).
| Class / Combat Style | Ability | Icon |
|---|---|---|
| Sith Inquisitor / Jedi Consular | Whirlwind/Force Lift | |
| Assassin / Shadow | Mind Trap / Mind Maze | |
| Juggernaut / Guardian | Intimidating Roar / Awe |
Builds
I only have one PvP build I use at the moment. Here are the details.
PvP Build - The Stunner
This is my current PvP build. This build is focused on being mobile with solid utility.
GEAR
- Crit pieces/Enhancement - Mainhand, Earpiece, Head, Boots, Gloves, Legs, Implants (Implants 340, everything else 336)
- Alacrity pieces/Enhancement - Offhand, Chest (336)
- Belt & Bracers - 336
- Relics - Focused Retribution and Serendipitous Assault (336)
- Earpiece - Thyrsian Adept Earpiece (336)
- Legendary Implants - Unmatched Haste, Dynamic Force (340)
- Tactical - Endless Barrier
- Augments - Crit: 4 Alacrity: 10 (286 & 300)
- Colour Crystals - Eviscerating (Crit)
- Stim - Advanced Kyrprax Versatile Stim
Ability Tree Flex Spots and Additional Info
ABILITY TREE FLEX SPOTS
- Level 23 - Both Rally and Haste are good options. What's beneficial about Haste is having an instant cast Dark Infusion gives you a handy burst combo to keep yourself or someone else alive. Rally, on the other hand, gives you two heals for the cost of one but, you cannot choose where the second heal goes. If you're more focused on AoE healing, perhaps go with Rally. But if you want a little more single-target burst, I'd go with Haste.
- Level 64 - All options on this row are good choices. However, I prefer Backlash cause I like being able to stun players who get too close to me. Not a match goes by where I don't stun at least one person with 'bubble stun'. It really is nice to give yourself that little extra breathing room especially when using the terrain to your advantage (eg. Voidstar pillars). Plus it can be pretty funny sometimes. If I wasn't using Backlash, I would probably use Surging Speed.
- Level 68 - I like the utility that Phase Walk provides. It basically gives you an extra cooldown when placed well and has saved my life many times. If you wanted to, you could choose Whirlwind. But, in my experience, ~90% of the CCs I place in PvP get broken by a teammate so it's not worth it.
NOTES
The Backlash Passive (64) pairs with the Endless Barrier Tactical as it allows you to keep Static Barrier up more often. This is because Unnatural Preservation removes the deionize debuff that prevents you from placing another Static Barrier on yourself.
Essential PvP Tips and Tricks
In this section of the guide, I go over some essential PvP tips and tricks. They will help you better understand how to heal in PvP and how to be a better PvPer.
This is an absolutely critical skill that you should work on if you truly want to master PvP.
What is Situational Awareness? Basically, it is the ability to be aware of your surroundings (what is happening around you) while simultaneously being able to perform your designated role within the ruleset of whatever environment you’re in.
In PvP in SWTOR, this means simultaneously:
- Being aware of the current circumstance of the Warzone. Is your team winning or losing? How many points does your team have?
- Constantly being aware of where your teammates are and where the enemy team is. Essentially, you should be asking yourself: Do I need to be here? Should I be elsewhere? Where is my team? How are they doing? AKA the numbers game.
- Being aware of your own situation. If you’re taking a lot of damage, pop a defensive cooldown or LOS the damage. Melee DPS in particular need to be mindful of if they’ve strayed too far from their team. A good melee DPS will go back to their teammates for healing when their health starts to drop real low. Healers generally will not chase after melee DPS who stray too far away and don’t have the smarts to come back into range of healing.
To further expand on the second point, here are a few strategies you can use to help you be more situationally aware.
- If you are not defending, at the very least, note who is. That way, if you see their health drop, you know they’re under attack! Yes, the person defending should call out but most of the time this does not happen or they call too slow or too late. Being aware of who is defending and being able to get to them to help them quickly could mean the difference between winning and losing a match. One way to help you keep a better eye on who is defending the node is to have them on ‘Focus Target’. That way, you can see if they’re get sapped as well as more easily monitor their health.
- You should be vaguely aware of how many teammates are with you and how many enemies there are. For example, if you’re in a Civil War or Yavin Ruins and there are 6 of you verses 4 of the enemy team at a control point, then you should be asking yourself, where is the rest of the enemy team? Am I needed elsewhere? Depending on the enemy teams composition, you're almost certainly needed elsewhere.
If you can master situational awareness then you will excel at PvP. It does take time to master as it does take time to learn all about the various things you need to be aware of simultaneously.
- Positioning – Make sure you position yourself towards the back of the pack. Stand near something like a pillar that you can use to ‘line of sight’ incoming damage. Use the environment to your advantage.
- Kite – Learn to move around while healing (yes you can do that) regularly even if it is not necessary so that when you do have to run away or run around pillars (eg. Civil War Mid & Voidstar) you can keep healing.
- Find a Pocket Tank – If you can find one (good luck finding one who knows what they’re doing) you won’t know yourself! Trust me, it makes a difference to your survivability having a tank around to taunt incoming damage, peel, stun and annoy anyone trying to kill you.
- Learn to not use your CC Breaker – you’ll find yourself white barred and stun locked pretty frequently. So save your CC breaker for only dire circumstances and only use it when you’re white barred except in exceptional circumstances.
- Smart Healing – Accept that you’re not going to be able to keep everyone alive. This is the reality of healing. Don’t waste your time chasing after someone who is LOSing you or chasing a melee that is too far away from the node. Know your limitations. If someone is close to death don’t waste your resources trying to get them back up unless you know you can do it without compromising you Heat or if it’s crucial for keeping the objective. This is where playing other classes comes in handy as it helps you learnwhat other classes are capable of in terms of damage output which will inturn help you learn what you can heal through.
- Node Guarding – Yes, this will likely happen on the odd occasion (but really, you shouldn’t be guarding unless there are 2-3+ other healers on your team). All you need to do is stand around 30 meters away from the objective and out of sight if possible. That way, it makes it harder for stealther’s to sap cap you. Remember to call out as soon as you see someone coming. While you wait for reinforcements run around, LOS and stay alive for as long as possible while you wait for reinforcements.
Resolve is a system that mitigates the effect of impairing/crowd control abilities on a player. Even as a healer you need to understand how resolve works, how it will affect you and how your stun, CC (crowd control/mezz) and knockback (all CC effects) will affect resolve. When you stun, CC or use a knockback your opponent will fill up their white bar incrementally. Once their bar is full they are immune to stuns, CC’s and knockbacks for a short duration until their white bar gets reset to zero. The resolve bar appears under the character name.


If you have a full resolve bar most of the time, this generally gives you an advantage. However good players can use the resolve system against you. If they know how much resolve an ability builds, they can time their abilities out to prevent you from getting white-barred. Or they can deliberately white-bar you (when they know you’ve used your CC breaker already) and potentially cap an objective.
The Resolve Bar is divided into 4 sections which each have 4 parts totalling 16 parts.
Here is a table that shows how much Resolve Stuns, CC’s and knockbacks build.
| Ability Type | Resolve Bar | Resolve |
|---|---|---|
| Crowd Control | 13/16 | |
| AoE Crowd Control | 10/16 | |
| Stun | 13/16 | |
| Knockback | 3/16 |
The rate at which resolve diminishes is 1/16 per 2 seconds.
The most important tip of all! Being able to predict who is going to take damage, how much damage they're going to take and judging the rate they're taking damage takes time and practice. Knowing which heals to use and who gets healing priority also takes time and practice.
PvP a lot. Don’t get discouraged by yourself or anyone else. Have patience with yourself. Keep at it and you will get better!
Special Thanks
Thank you for reading this guide! Let me know your thoughts in the comments below or on Social Media. And a special thank you to my Patrons and Twitch Subscribers for your continued support!
Thank you to Blay, Invidia + others for your tips/insights in Twitch chat!

