Welcome to my Feast of Prosperity Event Guide! It contains everything you need to know about the Event with helpful tips and infographics to help you master the kitchen! This is now an annual event in Star Wars The Old Republic that takes you to Nar Shaddaa and other planets to create and obtain culinary delights!
The “I Don’t Have to Put up with This” Achievement is now obtainable! Details –https://mmobits.com/2020/10/21/feast-of-prosperity-event-guide/#I_dont_have_to_Put_up_with_This
Last Updated – 13th October 2021
Quick Details
The Feast of Prosperity is an annual In-Game Event in Star Wars The Old Republic introduced in Game Update 6.1.4.
- Date: October 12 – November 2, 2021 (BEGINS AND ENDS AT 5:00AM PST/12:00PM GMT)
- Requirement: Level 20+
Over the years, the Hutt Cartel’s reputation has taken a hit. The once-powerful organization no longer instils respect and fear. To restore the Cartel’s influence, two up-and-coming Hutts, Gaboorga the Abundant and Duuba the Magnanimous, are throwing the most lavish “charitable banquet” in history for the galaxy’s underprivileged. And if the Cartel happens to advance their business interests during the Feast, everyone wins!
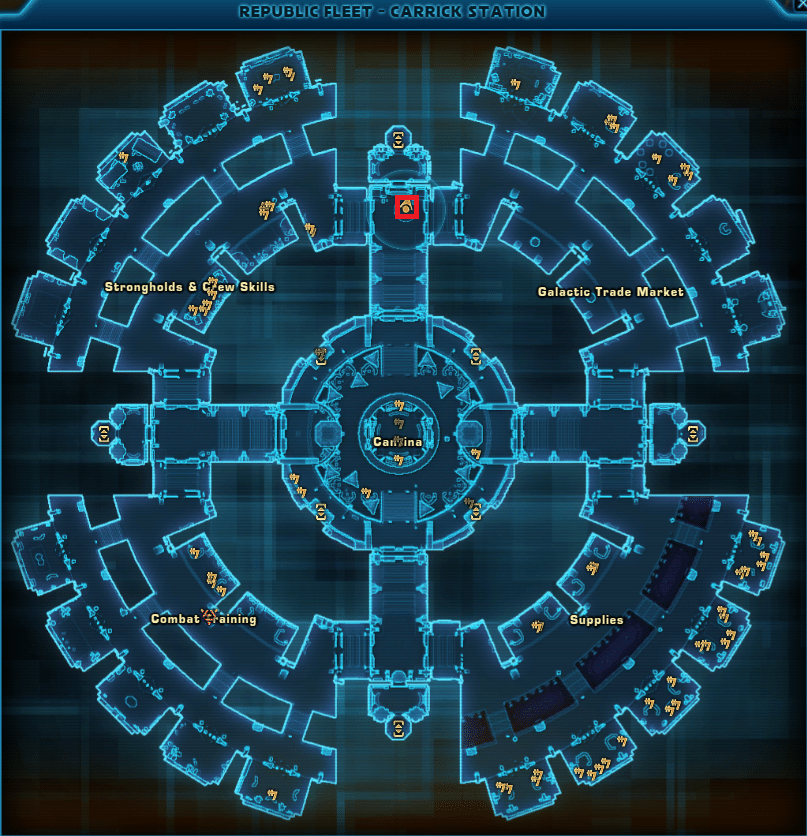
To get started with the Feast of Prosperity, head to your Faction’s Fleet.
How to Get Started – Introductory Mission
Speak to the Festival Crier located outside the Cartel Bazaar entrance on your factions fleet to do the Introductory Mission.

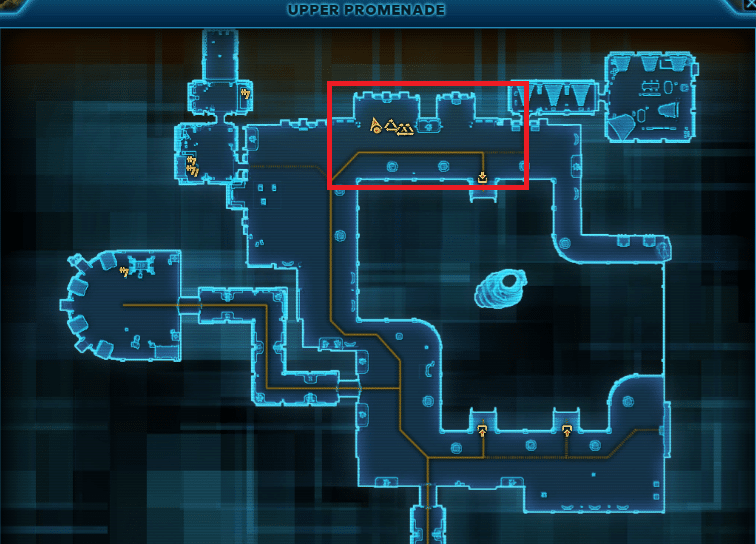
After Speaking to the Festival Crier, you will be directed to head to Nar Shaddaa to investigate the Event. The Event is located on the Upper Promenade not far from where the GSI Vendors/Mission Terminals are located.
PRO TIP: If you have the Nar Shaddaa Stronghold, you can use it as a quick way to get to the Promenade on Nar Shaddaa. All you have to do is travel to your Nar Shaddaa Stronghold via the Stronghold Management Window, then hit ‘exit area’ (near mini-map) and click the ‘exit to Nar Shaddaa’ option. You will then find yourself on the Promenade. Just head up the ramp north of the golden Hutt statue to the Upper Promenade and you’re right at the Event!
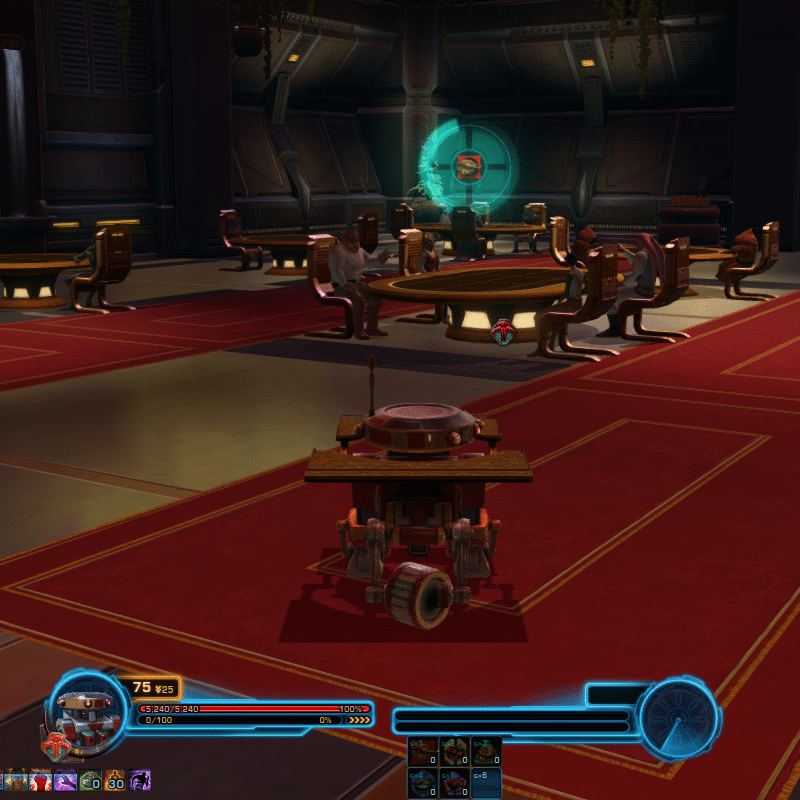
Speak to Gaboorga the Abundant then Duuba the Magnanimous to learn more about the Event. Once you’ve finished this Mission, you will gain access to the Event Dailies.
Event Overview
After completing the Introductory Mission, the Dailies and Weeklies will become accessible. They can be found close to Gaboorga and Duuba at Mission Terminals.
The Dailies can be divided into 3 categories.
- Ingredient Requests – go to other planets and get ingredients
- Prep Work
- [World Boss] Special Request (World Boss)
- Cantina Rush – you can only have one Cantina Rush Daily at a time but once you finish one daily you can go pick up the other one
- Cantina Rush: Lunch (Easy)
- Cantina Rush: Dinner (Hard)
- Kitchen – you can only have one kitchen daily at a time but once you finish one daily you can go pick up the other one
- Cooking
- Challenge Dish
Weeklies
- [WEEKLY] Cantina Rush
- Complete Cantina Dash Dailies: 0/3
- [WEEKLY] Kitchen Duty
- Complete Cooking Dailies: 0/3
- [WEEKLY] Ingredient Acquisition
- Complete Ingredient Dailies: 0/3
- [WEEKLY] World Boss Ingredients
- Complete World Boss Ingredient Dailies: 0/3
- [WEEKLY] The Feast of Prosperity
- Complete Weekly Missions: 0/3
Mission Rewards
- Event Currency – Prosperity Tokens
- Currency Limit – 10,000
- Legacy – Yes
Along with the usual Credits and XP/Renown XP, you will also get a new currency, Prosperity Tokens, from completing dailies and weeklies. This currency can be spent on items found on the Feast of Prosperity Token Vendor.

| DAILIES/WEEKLIES | TOKENS |
|---|---|
| Prep Work Dailies | 100 |
| [World Boss] Special Request Dailies | 200 |
| Cooking Dailies | 75 |
| Challenge Dish Dailies | 100 |
| Cantina Rush: Lunch Dailies (Easy) | 75 |
| [Bonus] Perfect Rush (Easy) | 10 |
| [Bonus] Perfect Rush (Hard) | 20 |
| Cantina Rush: Dinner Dailies (Hard) | 125 (all rounds) |
| [Weekly] Ingredient Acquisition | 750 |
| [Weekly] World Boss Ingredients | 750 |
| [Weekly] Kitchen Duty | 750 |
| [Weekly] Cantina Rush | 750 |
| [Weekly] The Feast of Properity | 2500 |
Prosperity Tokens also have a small chance to drop from random mobs anywhere in the galaxy.
Dailies
Cantina Rush Dailies
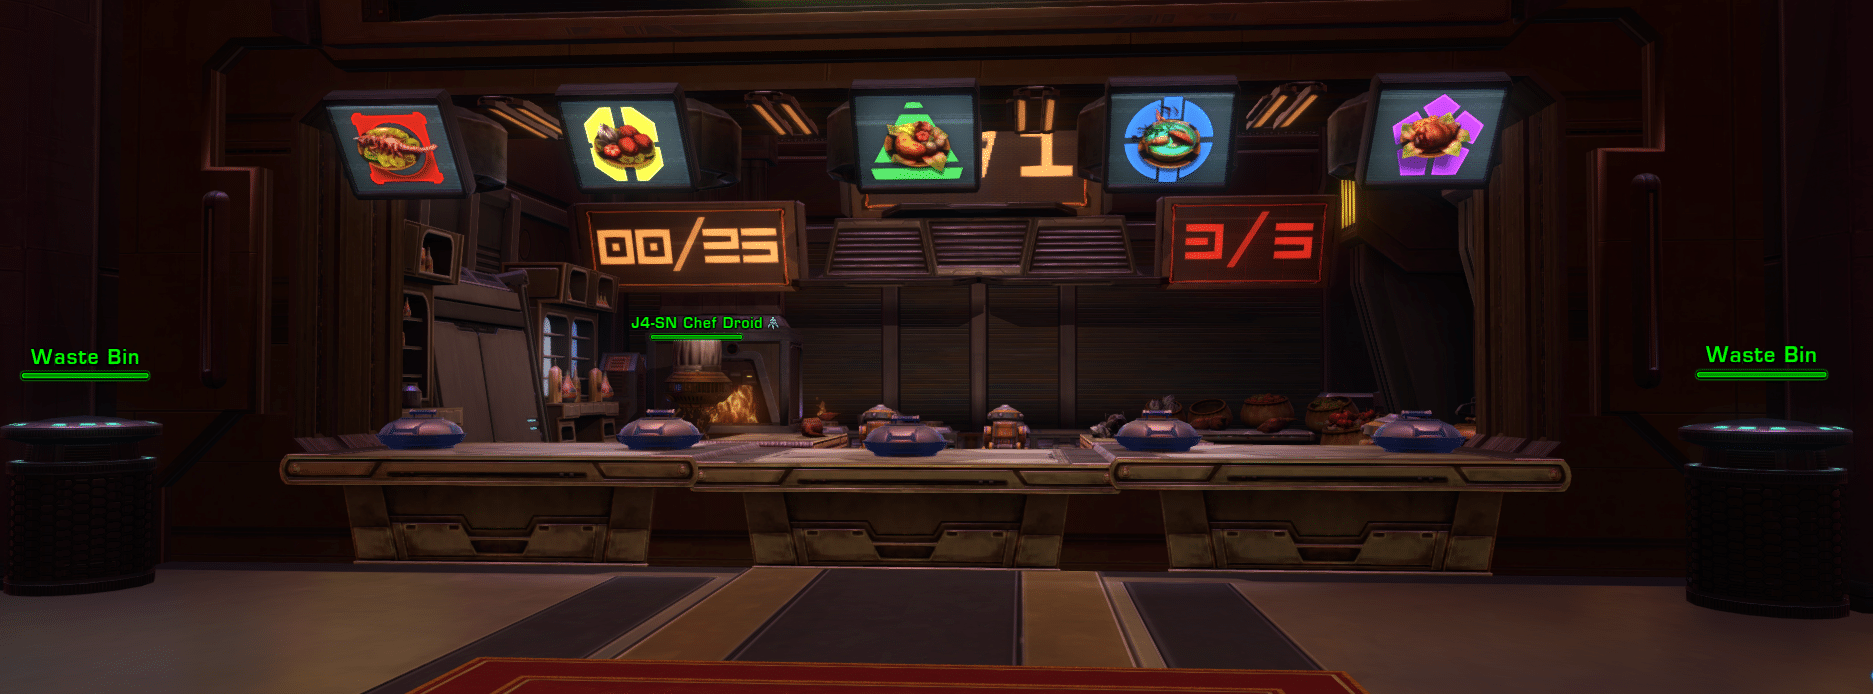
Remote control a service droid and serve food to patrons in the Banquet Hall.
Basic Explanation
When a table orders their dish, a colour-coded symbol and clock will appear above the table indicating what dish they want and how long you have to deliver it. You then go to the kitchen and pick up the dish they want (by clicking on it) then you take it to the table by clicking on the dish in your ability bar.


Detailed Explanation
There are two difficulties, easy mode and hard mode. In the easy mode, there is only one course served and if you miss 5 meals the mission does not fail (you just don’t complete the bonus mission). In hard mode, there are 4 courses with each one getting progressively harder. If you fail in the first course, you fail the mission if you fail in one of the other courses you get kicked out of the Banquet Hall and the Daily completes with lesser rewards.
When a table is ready for their dish, a symbol will appear above the table. The symbol will indicate the dish that they want. Around the symbol is a clock indicating how long since the table ordered their dish. As time goes on the clock changes colour to indicate how long the patrons have been waiting for their dish.
You have 45 seconds to deliver a dish to a table.
- Blue – 0 seconds
- Green – 10 seconds
- Yellow – 30 seconds
- Red – 40 seconds


If you fail to serve a dish in 45 seconds, the clock will disappear and the table will glow red and you will no longer be able to serve that table a dish until the table ‘resets’.
To select a dish to serve to a table, all you have to do is click on the corresponding dish at the kitchen. Each dish is colour coded. Once you click on a dish, it will highlight the dish as an ability in your temporary ability bar.
| Honey Glazed K’lor’slug | Red | |
| Vegetarian Combo | Yellow | |
| Full Huttese Breakfast Platter | Green | |
| Swamp Lentil Soup | Blue | |
| Roast Bog Snarler | Purple |

When you reach a table, simply click on the matching dish you picked up from the kitchen on your ability bar to serve the dish.
The droid can carry up to 5 dishes. However, the more dishs the droid carries, the slower it goes.
A scoreboard will keep track of how many dishes you have successfully served and how many you failed to deliver. In challenge mode, the totals vary per course (see below).
Cantina Rush: Lunch Rush (Easy)
- Number of Courses – 1
- Number of Dishes to Serve – 25
- Number of Fails – 5
Serve 25 dishes to 25 tables.
Cantina Rush: Dinner Rush: (Hard)
| Course | Dishes | Fails |
|---|---|---|
| 1 | 25 | 5 |
| 2 | 20 | 5 |
| 3 | 18 | 4 |
| 4 | 15 | 3 |
As each round progresses, the number and frequency of dish requests increases. If you have multiple dishes to take out, it is better to drop off the closest ones first even if they haven’t been waiting as long to lighten your load so you can travel to further away tables faster.
Cooking and Challenge Dish Dailies
These dailies require you to create dishes using the ingredients located in the kitchen. There are two modes.
- Cooking – easy, no time limits, ingredients highlighted as you need them
- Challenge Dish – harder, time limits, no individually highlighted ingredients
Basically, with Cooking dailies, you cook a specific dish through a step by step process the mission guides you through with no time limits while highlighting each ingredient as you need it.
To use an ingredient, click on it then a temporary ability bar will pop up. Click on the food and throw it at the objective. Make sure you’re a good distance away from the objective for it to work. Eg. If you need to put an ingredient on the grill, make sure you are far away from the grill then throw the ingredient.
In Challenge Dish Mode, the mission will again guide you through a step-by-step process. However, all the ingredients are highlighted and you have a time limit to complete most steps/find ingredients. The timer does not start until you do the first step.
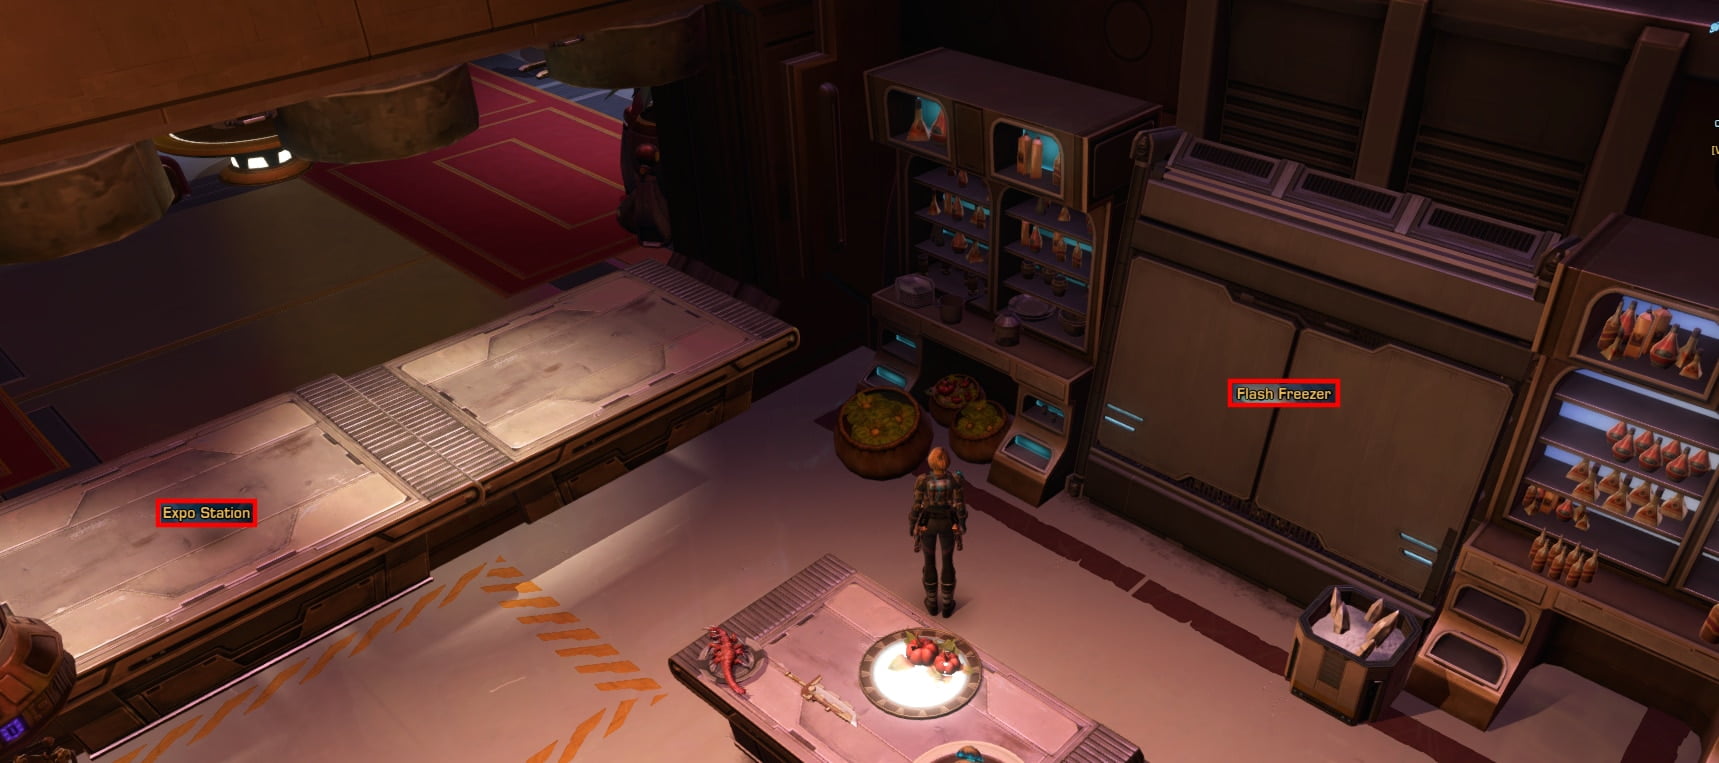
Kitchen Tour
Here is a look at where all the appliances are in the kitchen you will be doing the Dailies in.

Ingredients
The ingredient locations can be divided up into two areas. The Freezer area and the Door area.
Ingredients Table
Here is a table of all the ingredients in the kitchen, where they are located in the kitchen and what they look like.
| Ingredient Name | Location | Image |
|---|---|---|
| Bitter Kibla Greens | Basket – Freezer Side |  |
| Fresh, Slimy Vel Slug | Table – Freezer Side |  |
| Tart Bloatgourd | Table – Freezer Side |  |
| Earthy Glowshrooms | Table – Freezer Side |  |
| Perfect Ice Crystals | Bucket – Freezer Side |  |
| Thick Gloat Slurry | Cabinet – Freezer Side |  |
| Balmorran Vinegar | Cabinet – Freezer Side |  |
| Fatty Scyk Belly | Stove – Door Side |  |
| Salinated Soz Juice | Stove – Door Side |  |
| Starchy Bekbek Root | Table – Door Side |  |
| Sweet Vromfruit | Table – Door Side |  |
| Chewy Nexu Tongue | Table – Door Side |  |
| Rich Primeval Bone Marrow | Table – Door Side |  |
| Sour Bellfruit | Boxes – Door Side |  |
| Gelatinous Geo Beast Brain | Boxes – Door Side |  |
Ingredient Location Diagrams
Here are images of showing where all the ingredients are located in the kitchen.


Seasonings
Once you have completed a Dish, you get the option to add seasonings to your dish. In Cooking mode, it does not matter which seasonings you use. In Challenge mode, you have to use specific seasonings and it doesn’t tell you which ones but instead gives you clues.
| Icon | Seasoning | Description |
|---|---|---|
| Crushed Black Hole Pepper | Adds a bit of brain-bending heat to the dish. | |
| Comet Dust | Adds a unique tingling salty flavor to the dish. | |
| Gloambean Sauce | Sprinkle a bit of the sauce to add a rich, deep heartiness to the dish. | |
| J4-SN’s Seasoning Combo | A bit of this secret combination makes any dish better. |

Cooking Dailies – Step-by-Step
Here are the step-by-step instructions for some the Cooking Dailies for reference. The ingredients can vary sometimes.
Cooking: Jellied Growshroom Stew
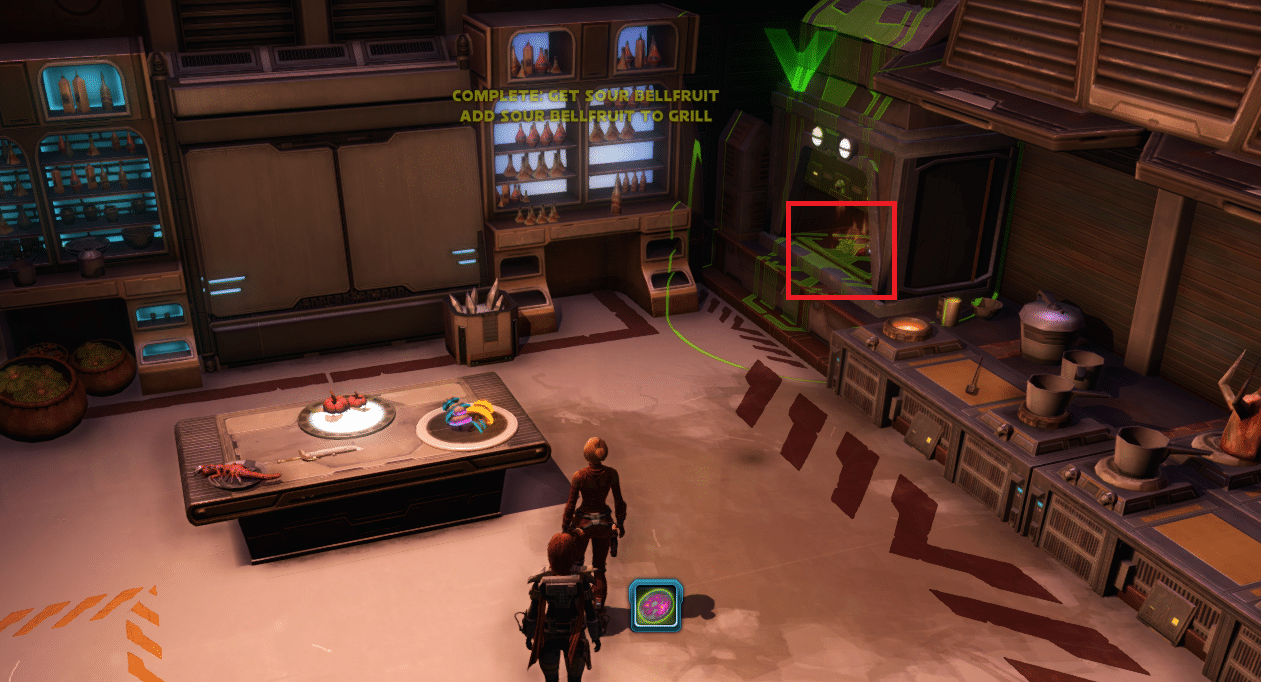
Turn on the Stove -> Prepare Glowshrooms 0/3 -> Add Kibla Beans -> Lower Heat -> Simmer Until Fragrant -> Raise Heat -> Get Scyk Belly -> Add Scyk Belly -> Get Balmorran Vinegar -> Add Balmorran Vinegar -> Take Dish from Stove -> Place in Flash Freezer -> Wait for Thin Layer of Ice -> Remove Dish from Freezer -> Place Dish on Expo Station -> Add Seasonings 0/3 -> Await Judgement
Cooking: Braised Scyk Belly
Tenderize Scyk Belly -> Add Scyk Belly to Pot -> Get Vormfruit -> Add Vormfruit to Pot -> Get Geobrain -> Add Geobrain -> Turn up the Heat -> Get Soz Juice -> Add Soz Juice -> Turn on Grill -> Collect Dish from Stove -> Place Scyk Belly on Grill -> Wait for Perfcect Char -> Remove Dish from the Grill -> Place Dish on Expo Station -> Add Seasonings 0/3 -> Await Judgement
Cooking: Exotic Medly Delight
Fire up the Grill -> Get Vormfruit -> Add Vormfruit to the Grill -> Get Primeval Bonemarrow -> Add Primeval Marrow to Grill ->Turn on Stove -> Prep Vegetable Medley 0/3 -> Add Medley to Pot -> Get Nexu Tongue -> Add Nexu Tongue to Pot – > Collect Stewed Ingredients, Collect Grilled Ingredients -> Place Dish on Expo Station -> Add Seasonings 0/3 -> Await Judgement
Prep Work and Ingredient Aquisition Dailies
Prep Work Dailies require you to go to other planets and collect rare ingredients. These ingredients are found in specific areas or drop from World Bosses. Typically, ingredients are located close to the World Boss spawn locations. You will go to the following planets:
- Tattooine
- Nar Shaddaa
- Hoth
- Belsavis
- Corellia
Pro Tip: Use the Activities Window for a quicker and free means of travel to each of these planets. All you have to do is go to the Activities window under the content menu then go to the Solo header then under Planetary Missions select the planet you wish to go to than press Travel. For example Content->Activities -> Solo -> Heroic Missions: Belsavis ->Travel. Travelling using this method is not only free but also bypasses the spaceports saving you extra time.
Both dailies reset every 12 hours rather than every 24 hours. The respawn timer for World Bosses (at least the Event ones) is now only 3-5 minutes instead of 2 hours.
Prep Work Dailies
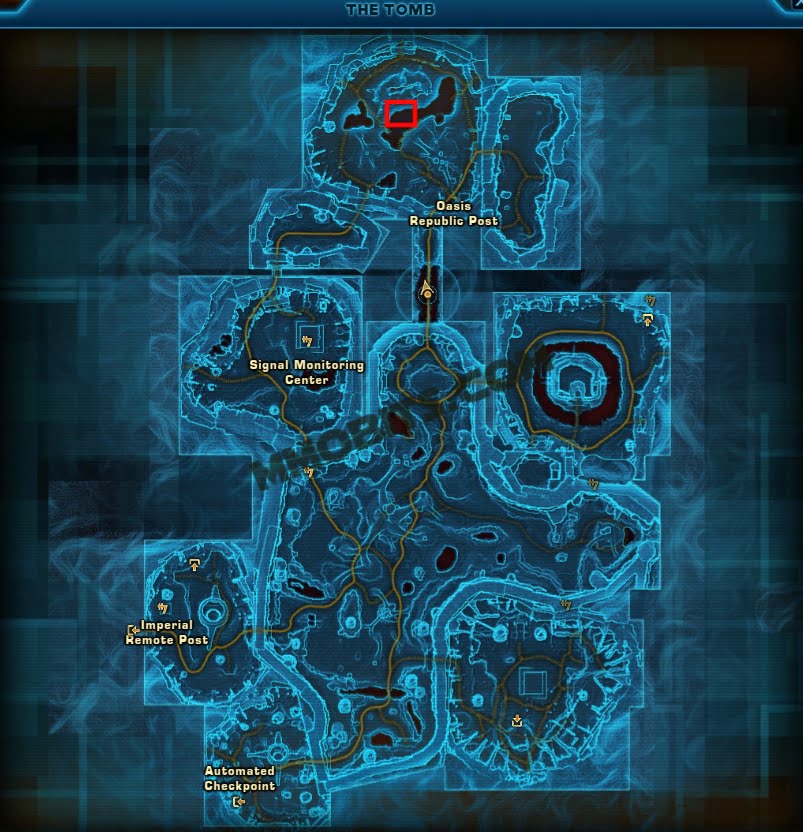
Prep Work: Primeval Marrow
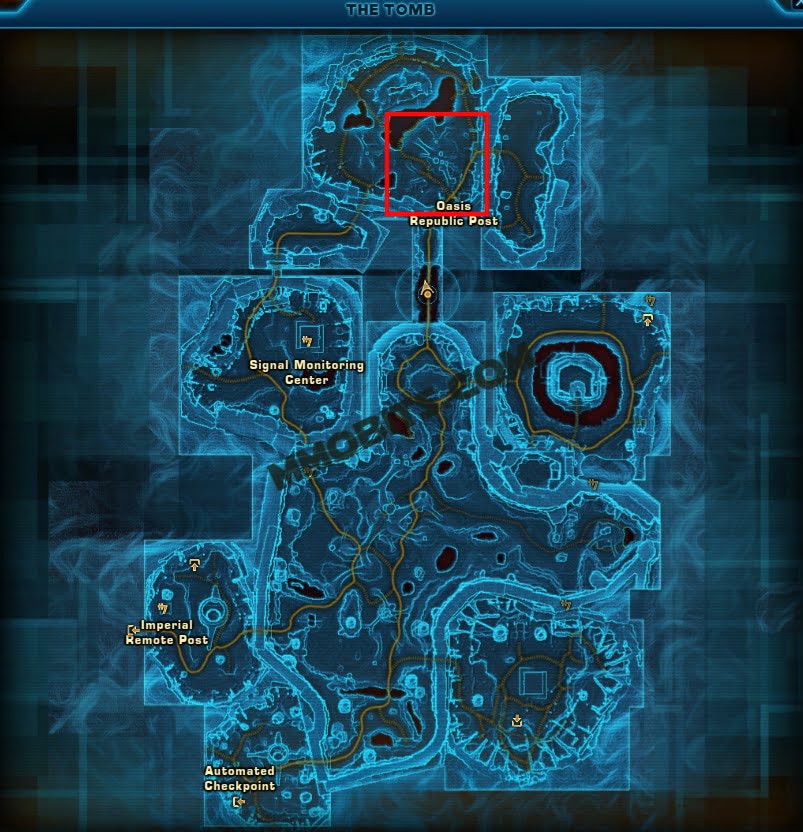
- Location – Belsavis: The Tomb
- Closest Base Imperial – Signal Monitoring Center
- Closest Base Republic – Oasis Republic Post
Kill Released Primeval Prowlers, Released Primeval Hunters and/or Released Supreme Stalkers in the Ancient Stasis Zone located in the northernmost area of The Tomb to retrieve Primeval Bone Marrow.


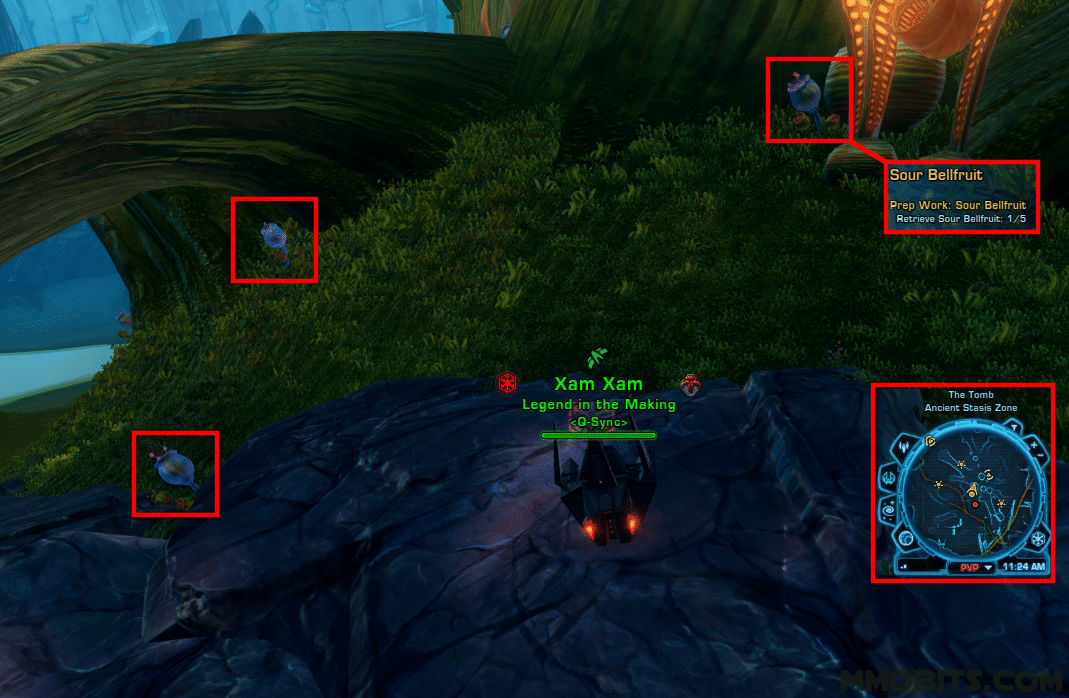
Prep Work: Sour Bellfruit
- Location – Belsavis: The Tomb
- Closest Base Imperial – Signal Monitoring Center
- Closest Base Republic – Oasis Republic Post
Collect the Bellfruit in the northernmost area of the The Tomb.
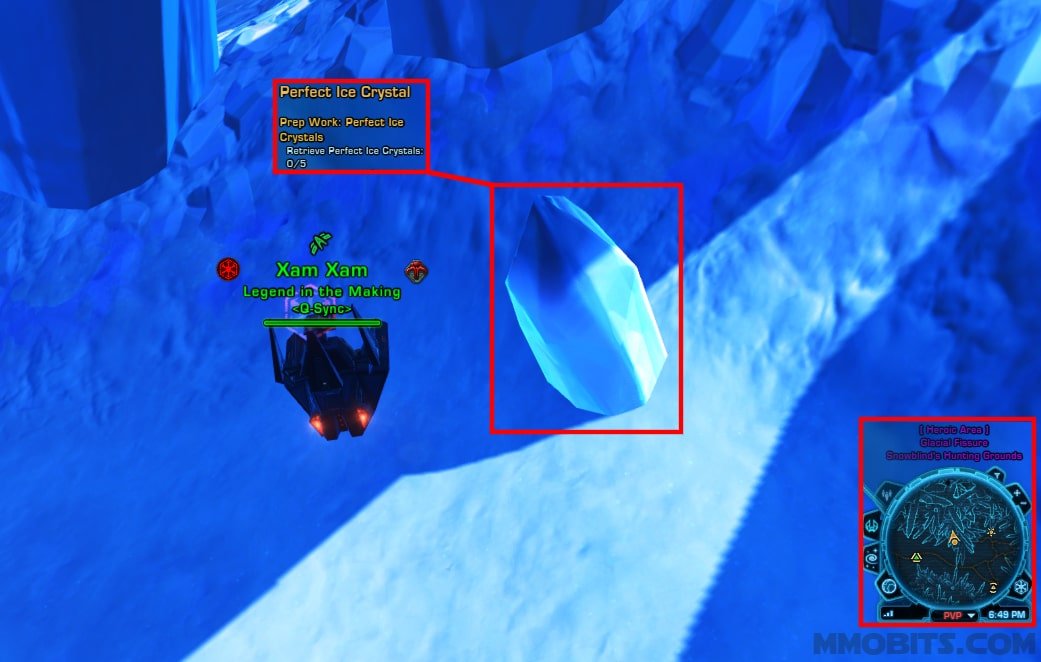
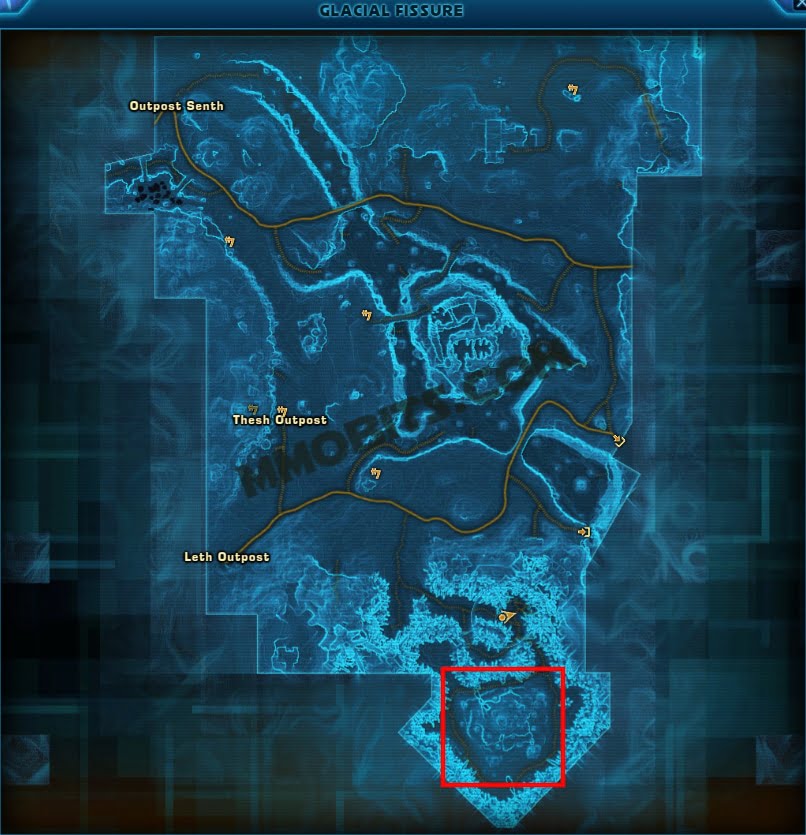
Prep Work: Perfect Ice Crystals
- Location – Hoth: Glacial Fissure
- Closest Base Imperial – Thesh Outpost
- Closest Base Republic – Outpost Senth
Collect Ice Crystals in the Crystal Wastes located in the southern part of the Glacial Fissure near Snowblind’s (World Boss) spawn area.

Prep Work: Larval Geo Beast Brains
- Location – Hoth: Glacial Fissure
- Closest Base Imperial – Thesh Outpost
- Closest Base Republic – Outpost Senth
Collect Larval Geo Beast Brain from ‘Geo Beast Larva’ south of Snowblind’s spawn location in the Glacial Fissure. Respawn times are currently slow. Geo Beast’s do not count. Mobs can be found all the way around and up the volcano.

Prep Work: Nexu Tongue
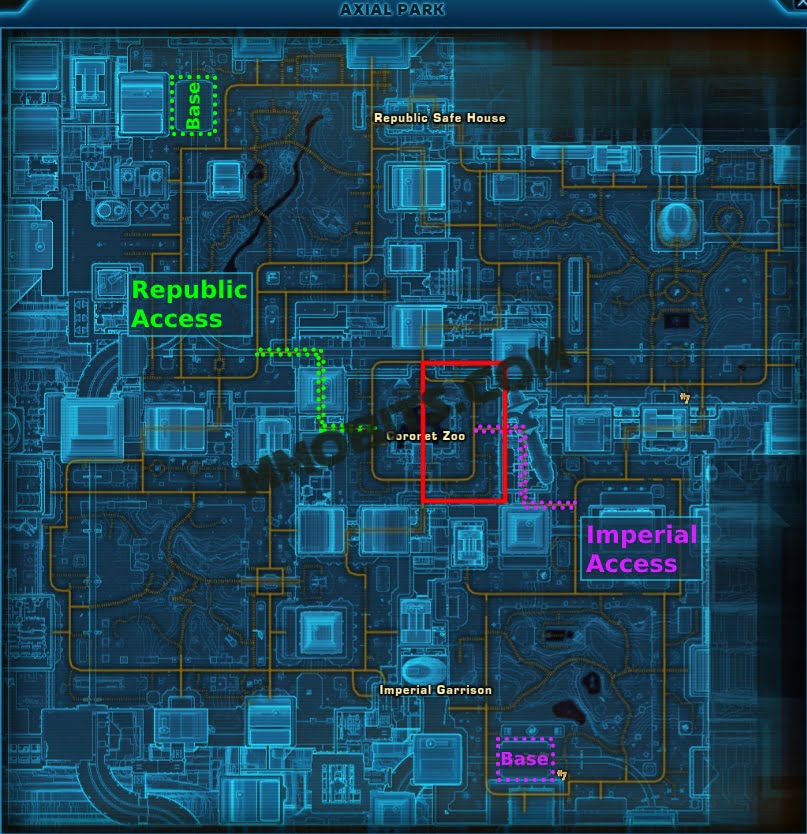
- Location – Corellia: Axial Park (Coronet Zoo)
- Closest Base Imperial – Axial Park South
- Closest Base Republic – Axial Park North
Collect Nexu Tongue’s from ‘Escaped Nexu’ at Coronet Zoo located in the Center of Axial Park. Jaggalor’s do not count.

Prep Work: Lost Recipe Data
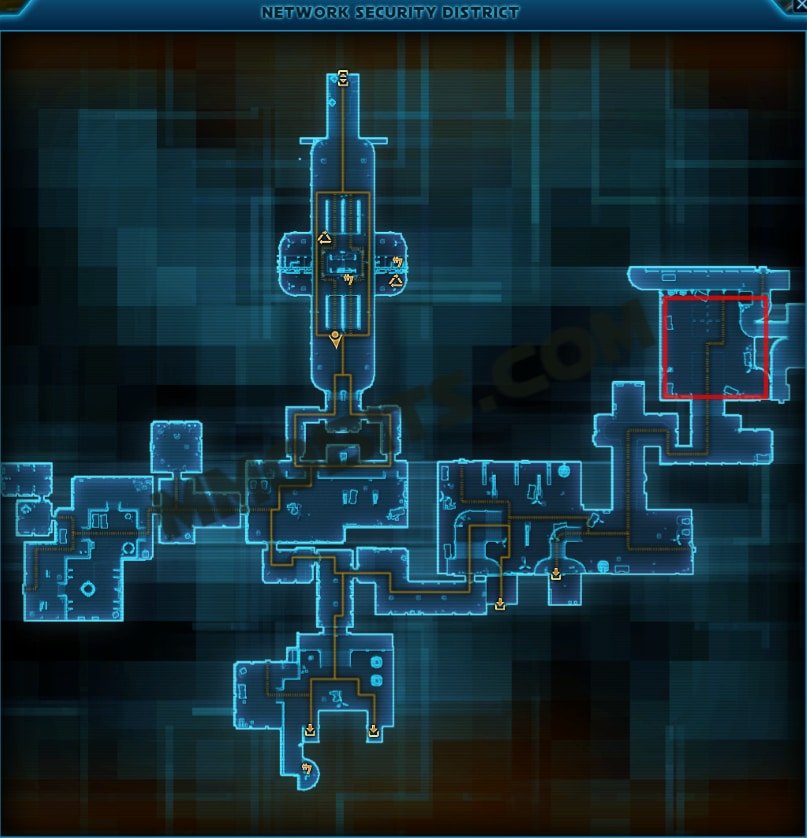
- Location – Nar Shaddaa: Network Security District (Bonus Series Area)
- Closest Imperial Base – Upper Industrial Sector or Network Security District (Bonus Series)
- Closest Republic Base – Lower Industrial Sector or High Security Lockdown (Bonus Series)
Retrieve Lost Recipe Data from ‘Renegade Droids’ in the Network Security District near the World Boss R4-GL.

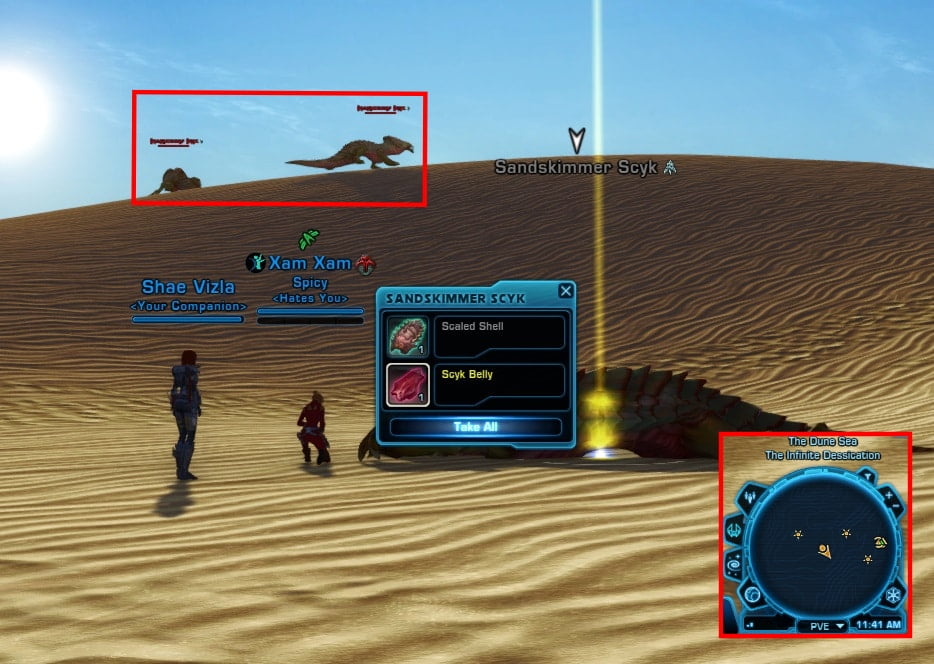
Prep Work: Scyk Belly
Retrieve Scyk Belly from ‘Sandskimmer Scyks’ in the Dune Sea near the World Boss, Trapjaw.
- Location – Tatooine: Dune Sea
- Closest Imperial Base – Outpost Zaroshe
- Closest Republic Base – Outpost Thorazan

World Boss Special Request Dailies
These dailies require you to kill a world boss and loot it for the required ingredient. The following world bosses have a daily.
- Lucky – Corellia
- The Primal Destroyer – Belsavis
- Snowblind – Hoth
- R4-GL – Nar Shaddaa
- Trapjaw – Tatooine
Pro Tip – If you’re on the Satele Shan Server, you can join the custom endgame channel to make it easier for you to find and join groups for world bosses throughout the Event. Type /cjoin Endgame to join the channel. This way you don’t have to sit around on Nar Shaddaa or the planet the world boss is on to start or join a group.
[World Boss] Special Request: Corellia – Lucky
Retrieve Rancor-Beast Liver from Lucky.
- Location – Corellia: Axial Park (Coronet Zoo)
- Closest Base Imperial – Axial Park South
- Closest Base Republic – Axial Park North
Lucky is located in an enclosure with 4 different openings as indicated on the map below.
Note you should summon your group from outside the enclosure otherwise it will instant kill the group members as they load in.

Basic Mechanics
- Tank –1
- Heals – 2
- DPS – rest
- Group size minimum – 8+ (more than 8 highly recommended)
A long tank and spank fight. Far easier than it used to be. Some damage going out fairly regularly to the tank and raid but should be easily healable by two healers or one competent one. Best to have as many DPS as possible to get the boss down faster otherwise it’s quite slow with a group of 8 (6 DPS, 1 Tank, 1 Heals).
If you want to make the fight even easier, interrupt Lucky’s ‘Ground Smash’ ability to significantly reduce AOE damage going out to the raid.
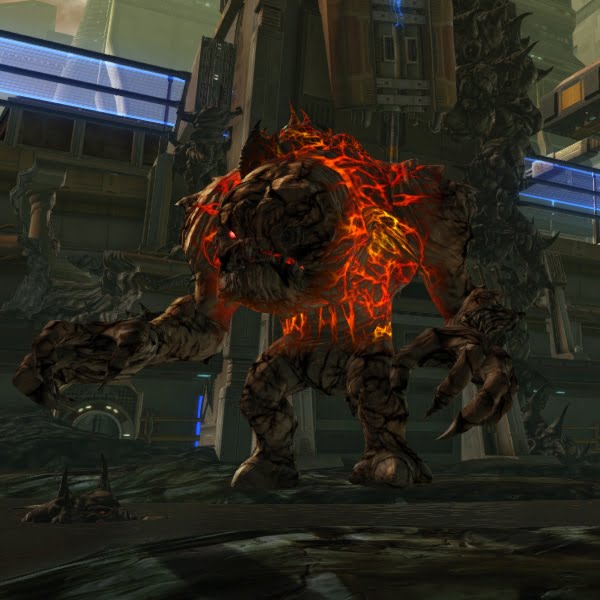
[World Boss] Special Request: Belsavis – The Primal Destroyer
Retrieve Parasitic Clingmoss from the Primal Destroyer.
- Location – Belsavis: The Tomb
- Closest Base Imperial – Signal Monitoring Center
- Closest Base Republic – Oasis Republic Post

Basic Mechanics
- Tank – 1
- Heal – 2
- DPS – rest
- Group size minimum – 6-8+
Tank and spank. Tank boss with back to the rocks. Ignore adds that spawn and heal through the damage. Once the boss is down, kill adds. You must kill the adds or the boss will bug out and not respawn.
[World Boss] Special Request: Hoth – Snowblind
Retrieve Ice Cat Whisker from Snowblind.
- Location – Hoth: Glacial Fissure
- Closest Base Imperial – Thesh Outpost
- Closest Base Republic – Outpost Senth


Mechanics
- Tank – 1
- Heals – 1-2
- DPS – rest
- Group size minimum – 6+
Basically a tank and spank. Some healing needed. Boss periodically knocks back melee players and disappears in a blizzard. Raid should stack up when this happens.
[World Boss] Special Request: Nar Shaddaa – R4-GL
Retrieve Poola Blossom Threads from R4-GL.
- Location – Nar Shaddaa: Network Security District (Bonus Series Area)
- Closest Imperial Base – Upper Industrial Sector or Network Security District (Bonus Series)
- Closest Republic Base – Lower Industrial Sector or High Security Lockdown (Bonus Series)

How to get to R4-GL
Imperial – Upper Industrial Sector -> Republic Research Division -> SYSTECH WEST ELEVATOR -> Network Security District

Republic – Lower Industrial Sector -> Imperial Intelligence Gadget Warehouse -> SYSTECH EAST ELEVATOR -> High Security Lockdown -> Network Security District

Basic Mechanics
- Tanks – 0-1
- Heals – 1
- DPS – rest
- Group size minimum – 4+
A pure tank and spank fight. No notable mechanics. Minimal healing needed.
[World Boss] Special Request: Tatooine – Trapjaw
Retrieve Wraid Ampulla Jelly from Trapjaw.
- Location – Tatooine: Dune Sea
- Closest Imperial Base – Outpost Zaroshe
- Closest Republic Base – Outpost Thorazan


Mechanics
- Tanks – 1
- Heals – 1-2
- DPS – rest
- Group size minimum – 6+
Basically a tank and spank fight. The tank will take spike damage. Periodic AOE damage going out as well. May be able to get away with no tank if the DPS ‘fake tanking’ has adequate heals.
Feast of Prosperity Token Vendor
Here is a table and previews of all the items you can purchase from the Feast of Prosperity Token Vendor with Prosperity Tokens. There is no Reputation Track with this event so all you need is currency! The Vendor is located right near the mission terminals for the Event on the Promenade.
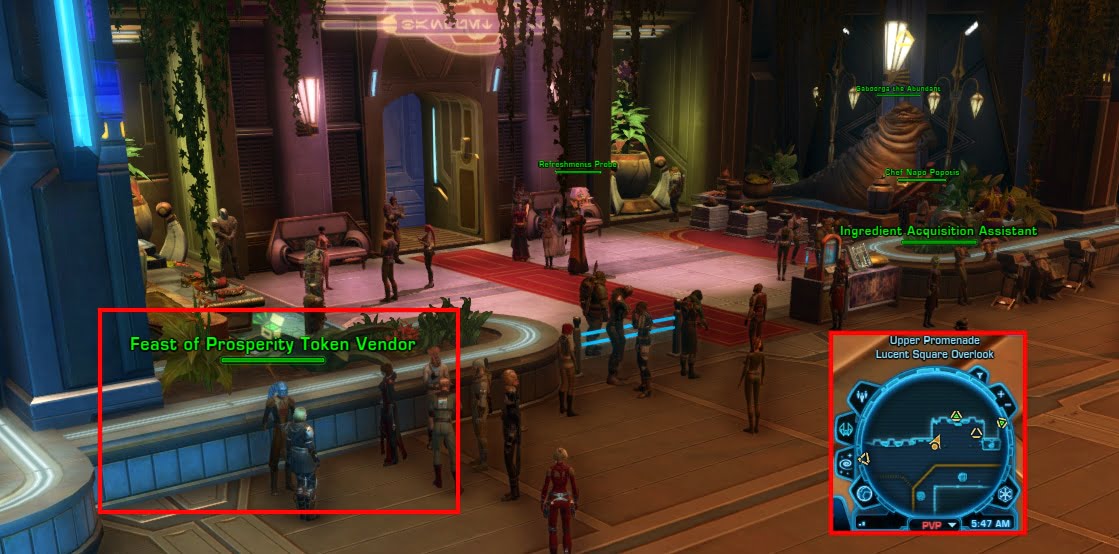
Note a couple of previews are missing and will be added ASAP.
| ITEM | TYPE | COST |
|---|---|---|
| Arrangement: Braised Vel Slug | Decoration | 850 |
| Arrangement: Exotic Medley Delight | Decoration | 850 |
| Arrangement: Feast Spread | Decoration | 1,875 |
| Arrangement: Galactic Sampler | Decoration | 850 |
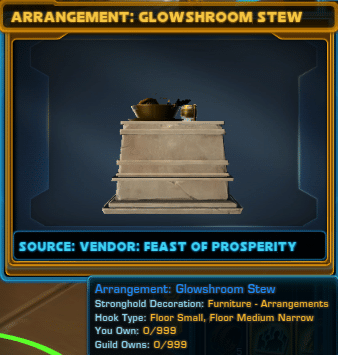
| Arrangement: Glowshroom Stew | Decoration | 850 |
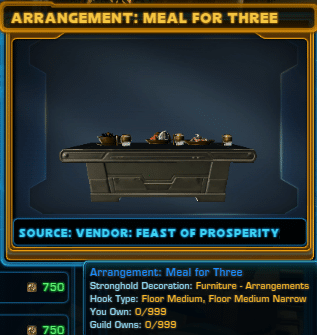
| Arrangement: Meal for Three | Decoration | 1,500 |
| Basket of Fruit | Decoration | 750 |
| Basket of Root Vegetables | Decoration | 1,125 |
| Basket of Veegetables | Decoration | 750 |
| Crate of Grain | Decoration | 750 |
| Daichyura Feast Celebrator | Decoration – Personnel | 1,875 |
| Disguise Terminal: Cantina Dasher | Decoration | 2,250 |
| Disguise Terminal: Ultimate Chef | Decoration | 2,250 |
| Duuba’s Guard | Decoration – Personnel | 1,875 |
| Duuba’s Protector | Decoration – Personnel | 1,875 |
| Earthen Thurrb | Pet | 1,875 |
| Emote: Feel the Groove | Emote | 3,750 |
| Emote: Overeat | Emote | 3,750 |
| Emote: Toast of Prosperity | Emote | 3,750 |
| Enhanced Seasoning for New Cooks | Tactical | 2,250 |
| Feast Attire Belt | Armor | 1,500 |
| Feast Attire Boots | Armor | 2,250 |
| Feast Attire Chestplate | Armor | 3,750 |
| Feast Attire Gauntlets | Armor | 2,250 |
| Feast Attire Helmet | Armor | 3,000 |
| Feast Attire Robes | Armor | 3,750 |
| Feast Ingredient Transport | Mount | 3,750 |
| Feast Preparation Hat | Amor | 1,500 |
| Feast of Prosperity Food Launcher | Toy | 7,500 |
| Feast of Prosperity Poster I | Decoration | 750 |
| Feast of Prosperity Poster II | Decoration | 750 |
| Hairless Mudhorn | Pet | 1,875 |
| Improved Axel Grease | Tactical | 2,250 |
| Meditative Satiation | Regen Toy | 2,250 |
| Overstuffed Food Sack | Toy | 3,750 |
| Refreshments Probe | Decoration – Personnel | 1,875 |
| Single Use Food Launcher | Toy | 150 |
| Title: The Finest Ingredient | Title | 1,500 |
| Title: Well Seasoned | Title | 1,500 |
| Ugnaught Feast Celebrator | Decoration – Personnel | 1,875 |
Decorations


Pets


Armor


Emotes
Toys and Mounts


Tacticals
Please note it is not worth buying these tacticals at all.


Conquest Objectives
Objectives and Points
| Conquest Objective | Type | Points | SH Bonus Points |
|---|---|---|---|
| Feast of Prosperity: Expedited Service | Infinite | 750 | 1,875 |
| Feast of Prosperity: Front of House Manager | Daily Repeatable | 3,350 | 8,375 |
| Feast of Prosperity: Galactic Delicacies | Daily Repeatable | 41,750 | 104,375 |
| Feast of Prosperity: Hutt-treme Epicure | Daily Repeatable | 44,850 | 121,125 |
| Feast of Prosperity: Ingredient Connoisseur | Daily Repeatable | 19,880 | 49,500 |
| Feast of Prosperity: Master Chef | Daily Repeatable | 3,350 | 8,375 |
| Feast of Prosperity: Prepped for Success | Infinite | 3,350 | 8,375 |
| Feast of Prosperity: Sous-Chef | Infinite | 750 | 1,875 |
| Feast of Prosperity: Story | Infinite | 6,400 | 16,000 |
Objective Descriptions
| Conquest Objective | Description |
|---|---|
| Feast of Prosperity: Expedited Service | Complete any Cantina Rush mission during the Feast of Prosperity event. |
| Feast of Prosperity: Front of House Manager | Complete the mission: [WEEKLY] Cantina Rush during the Feast of Prosperity event. |
| Feast of Prosperity: Galactic Delicacies | Complete the mission: [WEEKLY] World Boss Ingredients during the Feast of Prosperity event. |
| Feast of Prosperity: Hutt-treme Epicure | Complete the mission: [WEEKLY] The Feast of Prosperity during the Feast of Prosperity event. |
| Feast of Prosperity: Ingredient Connoisseur | Complete the mission: [WEEKLY] Ingredient Acquisition during the Feast of Prosperity event. |
| Feast of Prosperity: Master Chef | Complete the mission: [WEEKLY] Kitchen Duty during the Feast of Prosperity event. |
| Feast of Prosperity: Prepped for Success | Complete any Prep Work mission during the Feast of Prosperity event. |
| Feast of Prosperity: Sous-Chef | Complete any Cooking mission during the Feast of Prosperity event. |
| Feast of Prosperity: Story | Compelte any Feast of Prosperity Story mission during the Feast of Prosperity event. |
Hidden Achievements
Here are all the Hidden Achievements for the Feast of Prosperity Event.
Food Fight!
Events -> Feast of Prosperity -> General
“Threw food at banquet attendees from the kitchen of Bog’s Bounty Banquet Hall.”

After picking up an ingredient, while doing a Cooking Daily, throw it at a table in the banquet hall.

What did you Put in This?
Events -> Feast of Prosperity -> General
“Added an unconscionable amount of Black Hole Pepper to dishes during normal Feast of Prosperity cooking missions and become a master of Bog’s Bounty Banquet Hall through hard mode cooking and cantina rush missions.”
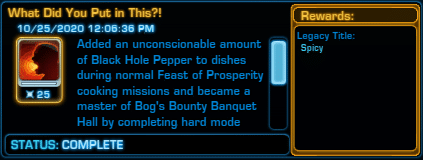

- Complete 25 Challenge Cooking Missions
- Complete 25 Hard Cantina Rush Dailies (you can fail it and it still counts)
- Added 75 Black Hole Pepper in Easy Cooking Mode (complete 25 Easy Cooking Missions and add 3 Black Hole Pepper each time)
With the Hard Cantina Rush dailies, all you have to do is pick up the daily and enter the instance then fail the daily to get completion credit towards the achievement and complete one round. You should get credit if you complete one round and fail the next tone.
All you have to do is complete 25 Easy Cooking Missions and add 3 Black Hole Pepper each time to get 75 Black Pepper for the achievement.
To see your progress towards getting this achievement, you have to inspect someone’s achievements who has already earned the achievement then link it in chat and click on it. This will then show your progress. If they link it to you, it only shows their completion and not your progress.
Thank you very much to Dyro, Kira_Jaga (along with EmpressShaynra & Randomno_2) and darkwolf for sending me the tips for this achievement.
I don’t have to Put up with This
This achievement is now able to be obtained after the developers deployed a hotfix. You can read about that here – https://www.swtor.com/community/showthread.php?p=9974651#edit9974651

To get this achievement, you need to meet two parameters.
- Leave the kitchen before completing each individual dish at least once. There are five different dishes that come up as dailies.
- Challenge Dish: Spicy Nexu Supreme
- Challenge Dish: Ultimate Glactic Sampler
- Cooking: Jellied Growshroom Stew
- Cooking: Braised Scyk Belly
- Cooking: Exotic Medly Delight
- Leave the kitchen a total of 31 times before completing a dish.
Once you have met both of these requirements, you should get the achievement.
Note: removal from the “Master of the Feast” Meta Achievement
Due to a bug with this achievement during the 2020 event, it was removed from the ‘Master of the Feast’ meta-achievement so players could complete that achievement and get the ‘Galactic Chef’ Legacy Titles (assuming you completed all the other required achievements).
Details – http://www.swtor.com/community/showthread.php?p=9893851#post9893851
Cantina Rush: A Perfect Lunch Rush
Events -> Feast of Prosperity -> Dailies
“Complete Cantina Rush: Lunch Service without missing a table.”

Cantina Rush: A Perfect Dinner Rush
Events -> Feast of Prosperity -> Dailies
“Complete Cantina Rush: Dinner Service without missing a table.”

Special Thanks
Thank you to everyone who contributed to the guide! Special thanks to Kat/Ash-es and his <Severed Hand> guildies plus my <Hates You> and <Korvus> guildies who helped me test the World Bosses. Special thanks to my Patrons! Your ongoing support helps make guides like this one possible.
And finally, special thanks to Andynul for begrudgingly helping me out with various tasks. I hate your guts.