
Here is my SWTOR Amplifiers Guide. This guide covers everything you need to know about Amplifiers in Star Wars The Old Republic.
Updated for Game Update 6.2.1. – Recent changes were made to the Amplifier System which is detailed in this article. This Guide has been updated/modified to include those changes.
Note – Tables are better viewed in Light Mode (see navigation menu for Light/Dark Theme toggle).
What are Amplifiers?
Amplifiers are a brand new supplementary Stat System that has been introduced to The Old Republic in Game Update 6.0, Onslaught.
It’s basically a bonus stat applied to gear shells, some modifications and left side gear pieces. These bonus stats can be recalibrated as many times as you like for a credit fee.
It is an entirely RNG based system not taken into account in balance targets (eg. Operation Boss DPS targets or PvP Bolster). It is entirely a bonus set of Stats.
Amplifiers are located on the following armour pieces –
- Armour Shells (except Mainhands and Offhands, this is intentional)
- Armourings
- Mods
- Relics
- Implants
- Earpieces
Keep in mind that Armourings, Mods and Enhancements as well as Shells, Relics, Implants and Earpieces are all Bind on Legacy. Costs to remove modifications from Armour Shells remain.
The Amplifier Stat’s value varies based on a percentage or number which is entirely rolled at random. These percentages are divided into 5 tiers based on quality (by the colour of the tooltip). The colour order from minimum to maximum is white, green, blue, purple and gold. If the tooltip is gold, then you’re Amplifier is at the exact maximum percentage obtainable.


The minimum and maximum percentages for Amplifiers vary. Crafting Amplifiers and some Combat Amplifiers, for example, range from 0.10% – 1.50%. Other Amplifiers can go up to 5.00%.
Recalibrating (Changing) Amplifiers
You can change an Amplifier by recalibrating it. There are two ways to access the recalibration window. Via the Character UI or by right-clicking on a gear piece to modify it.
To access amplifiers through the character sheet, simply open the character sheet and you will see the Amplifier List. This list shows you all the amplifiers on all the armour pieces you have currently equipped on your character. You can not move or minimise this list.
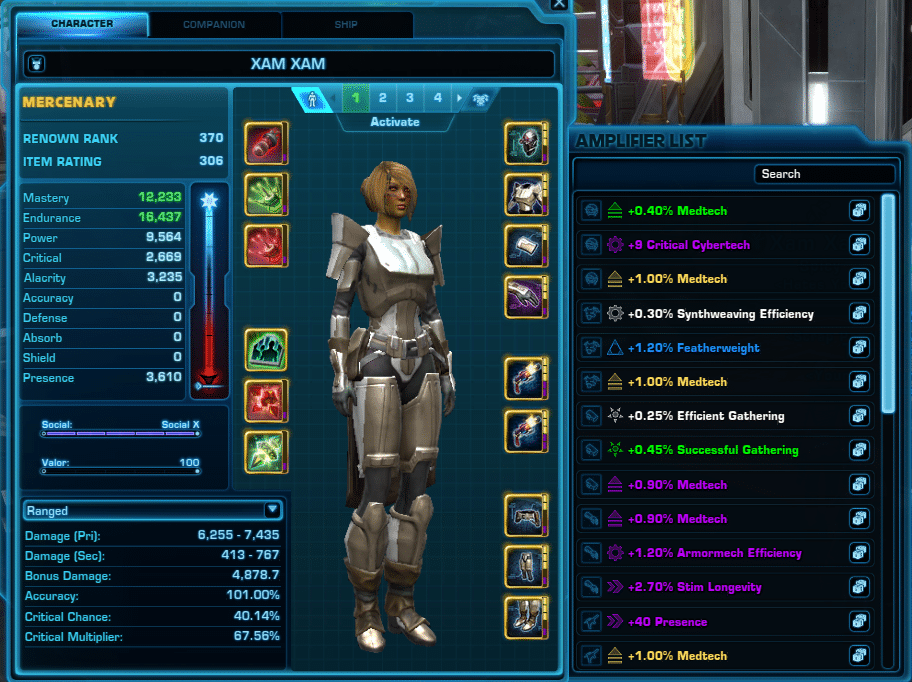
Click on the square shape next to the amplifier you wish to recalibrate to open the ‘Recalibate UI’.

Alternatively, to access Amplifiers via gear or mods. Once you CTRL + Right Click on the pice of gear/mod all you have to do is click on the Amplifier you wish to change in the Modification Window to open the Recalibrate window.

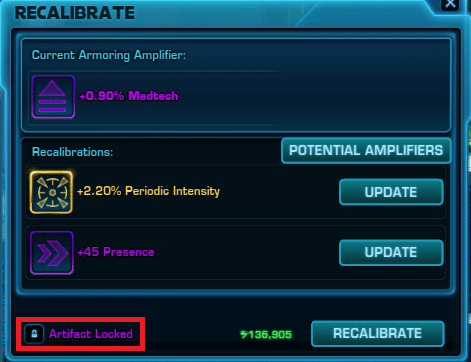
Recalibrating Amplifiers
To recalibrate an Amplifier, click on the ‘Recalibrate’ button. You typically get a choice between two new Amplifiers. The percentage or number that comes with the Stat is entirely random.

- Recalibrate/Reroll Button – clicking this will charge you the credit cost shown next to the button and give you to amps.
- Credit Cost for each reroll – cost goes up incrementally after each reroll
- Update Button – next to each potential amplifier. Clicking this will update the current amp to the one clicked.
- Potential Amplifiers Button – opens a list of all potential Amplifiers you can get from rerolling.
- Amplifier Tooltips – hovering over each Amplifier (including the current Amplifier) will give you a detailed tooltip.
If you do not like the options given to you, you can hit the ‘Recalibrate’ button again. For a list of potential amplifiers, click on the ‘Potential Amplifers’ button.
You can recalibrate an Amplifier as many times as you like, but the cost goes up each time you do. Every time you hit the Recalibrate button, you are charged the credits indicated on the button.
If you exit out of the Recalibration window without picking a new Amplifier, the currently rolled Amplifier options will be lost. A dialogue warning box will pop up. if you go back to that piece to recalibrate, the recalibration cost will remain the same as you left it the previous session at least until the weekly reset (more on that below).
Once you get the Amplifier you want, click on the ‘Update’ button next to the Amplifier you want. This will change the Amplifier that is currently on the modification to the one you selected.
Amplifier Rarity Locking
Rarity locking allows you to control the rarity of the potential Amplifiers you can get from recalibrating. This increases the cost of recalibration but reduces the number of potential Amplifiers you can get.
For example, if you currently have a purple rarity Amplifier, you can lock that rarity so that when you recalibrate, it will only give you purple and gold rarity Amplifiers.
Amplifier Recalibration Costs
Here’s a table of the recalibration costs.
| Rarity | Starting Cost | Locked Cost |
|---|---|---|
| Grey | 20,170 | N/A |
| Green | 20,170 | 58,493 |
| Blue | 20,170 | 80,679 |
| Purple | 20,170 | 131,103 |
| Gold | 20,170 | 403,394 |
It is not worth locking amplifiers at green rarity. If you lock amplifiers at green rarity, it will only roll green and white rarity amplifiers. Locking at blue rarity, on the other hand, will roll you amplifiers at blue rarity or higher.
The cost of rerolling still goes up incrementally each recalibration (reroll).
Amplifier Weekly Cost Reset
Game Update 6.2.1 introduced a weekly cost reset for Amplifiers. This will reset all recalibrations to their starting cost (see above). This reset occurs the same time as every other reset in the game (Tuesdays).
Amplified Champion Set Bonus
Before we get to the Amplifier lists, it is worth briefly discussing the Amplified Champion Set you can get from Conquest Crates and how you should use at least one piece to fill out your gear. Since the majority of beneficial Set Bonuses are 6-Set, that leaves you with one slot to use for an Amplified Champion Piece.
Amplified Champion armour shells have combat Amplifiers (instead of crafting/utility ones that all other armour shells have). This means the armour shells have the same Amplifiers as Armourings but the max percentage is less than half of that on Armourings. For example, instead of a 1.00% max Medtech Amplifier that Armourings can get, the max is only 0.40% on the Amplified Champion Shells.

Instead of wearing a 7-Set Bonus of whatever Set-Bonus you using, it is more beneficial to use just the 6-Set than use an Amplified Champion Set Piece as your 7th Piece. This way, you can benefit from an extra combat amplifier to improve your designated role performance.
Amplifiers Lists
Below, you will see my Amplifiers tables. A specific Amplifier will only appear on one slot type. For example, the Medtech Amplifier is only found on Armourings/Hilts/Barrels.
Non-moddable armour uses the Armourings/Hilts/Barrels Table.
Armour Shells/Relics/Implants/Earpiece and Mods mainly have Crafting and various QoL/Utility Amplifiers. Armourings/Hilts/Barrels are mostly combat-related.
Armour Shells and Relics/Implants/Earpiece
| NAME | DESCRIPTION | PERCENTAGE MAX |
|---|---|---|
| Armourmech Efficiency | Improves time efficiency of Armourmech Crafting | 1.50% |
| Armstech Efficiency | Improves time efficiency of Armstech Crafting | 1.05% |
| Artifice Efficiency | Improves time efficiency of Artifice Crafting | 1.50% |
| Biochem Efficiency | Improves time efficiency of Biochem Crafting | 1.50% |
| Cybertech Efficiency | Improves time efficiency of Cybertech Crafting | 1.50% |
| Efficient Synthweaving | Improves time efficiency for Synthweave Crafting | 1.50% |
| Efficient Archaeology | Improves time efficiency of Archaeology missions | 1.50% |
| Efficient Bioanalysis | Improves time efficiency for Bioanalysis missions | 1.50% |
| Efficient Gathering | Improves time efficiency for Archaeology, Bioanalysis, Scavenging, and Slicing missions | 1.50% |
| Efficient Scavenging | Improves time efficiency for Scavenging missions | 1.50% |
| Efficient Slicing | Improves time efficiency for Slicing missions | 1.50% |
| Resourceful | Increases the chance to obtain a bonus yield when harvesting a resource | 2.00% |
| Flashpoint Rewards | Increases Experience Points and Renown Points earned from completing a Flashpoint | 1.00% |
| Legacy Rewards | Increases Legacy Points earnedfrom all sources | 1.00% |
| Mission Rewards | Increases Credits, Experience Points, and Renown Points earned from completing a Mission | 1.00% |
| Operation Rewards | Increases Experience Points and Renown Points earned from completing a Operation | 1.00% |
| PvP Rewards | Increases Valor, Renown Points, and Experience Points earned from compleeting a Warzone or Arena | 1.00% |
| Starfighter Rewards | Increases Experience Points and Renown Points earned from completing a Galactic Starfighter battle | 1.00% |
| Efficient Diplomacy | Improve time efficiency for Diplomacy Missions | 1.50% |
| Efficient Investigation | Improve time efficiency for Investigation Missions | 1.50% |
| Efficient Treasure Hunting | Improve time efficiency for Treasure Hunting Missions | 1.50% |
| Eficient Underworld Training | Improve time efficiency for Underworld Trading Missions | 1.50% |
| Mission Efficiency | Improves time efficiency for Diplomacy, Investigation, Treasure Hunting, and Underworld Trading missions | 0.75% |
Armourings/Hilts/Barrels and Non-Moddable Armour Shells
Amplified Champion Armour Shells also use these Amplifiers (but do not go up to max percentage).
| NAME | DESCRIPTION | PERCENTAGE MAX |
|---|---|---|
| Alpha Strike | Increases damage done for 10 seconds after entering combat | 2.00% |
| Armour Penetration | Kinetic and energy damage attacks ignore a portion of the target’s armour | 2.50% |
| Aural Command | Increases the damage dealt by attacks that affect an area | 1.00% |
| Force Sensitivity | Increases the damage dealt by Force attacks | 1.00% |
| Periodic Intensity | Increases the damage dealt by periodic effects | 2.20% |
| Tech Wizardry | Increases the damage dealt by tech attacks | 1.00% |
| Weapon Expertise | Increases the damage dealt by weapon attacks | 1.20% |
| Presence | Increases the combat effectiveness of your companion | 50+ |
| Aural Rejuvenation | Increases the healing done by abilities that affect an area | 2.00% |
| Force Harmonisation | Increases the healing done by Force abilities | 1.00% |
| Medtech | Increases the healing done by Tech abilities | 1.00% |
| Periodic Restoration | Increases the healing done by periodic effects | 2.20% |
| Readied Healing | Increases healing done for 10 seconds after entering combat | 2.00% |
| Aural Resistance | Reduces the damage taken from attacks that affect an area | 1.00% |
| En Garde | Reduce damage taken for 10 seconds after enering combat | 2.00% |
| Force Protection | Reduces the damage taken from Force attacks | 1.00% |
| Fortuitous Redoubt | Reduces the damage taken from Force attacks | 0.50% |
| Periodic Resilience | Reduces the damage taken from periodic effects | 2.20% |
| Reinforced Armour | Reduces damage taken from weapon attacks | 1.20% |
| Tech Aegis | Reduces tha damage taken fromtech attacks | 1.00% |
Modifications
| NAME | DESCRIPTION | PERCENTAGE MAX |
|---|---|---|
| Critical Armourmech | Increases Armourmech crafting critical success chance | 10+ |
| Critical Armstech | Increases Armstech crafting critical success chance | 10+ |
| Critical Artifice | Increases Artifice crafting critical success chance | 10+ |
| Critical Biochem | Increases Biochem crafting critical success chance | 10+ |
| Critical Cybertech | Increases Cybertech crafting critical success chance | 10+ |
| Critical Synthweaving | Increases Synthweaving crafting critical success chance | 10+ |
| Succesful Archaeology | Increases chance to succeed on Archaeology missions | 1.50% |
| Succesful Bioanalysis | Increases chance to succeed on Bioanalysis missions | 1.50% |
| Successful Gathering | Increases chance to succeed on Archaeology, Bioanalysis, Scavenging, and Slicing missions | 0.75% |
| Successful Scavenging | Increases chance to succeed on Scavenging missions | 1.50% |
| Successful Slicing | Increases chance to succeed on Slicing missions | 1.50% |
| Durable Equipment | Equipment loses durability more slowly | 4.00% |
| Frequent Flyer | Lowers the cost of interplanetary travel | 4.00% |
| Influential | Increases the amount of influence your companions gain from all sources | 2.00% |
| Mount Speed | Increases the movement speed of your vehicles and creature mounts | 1.00% |
| Power Napping | Increases the rate at which Rested Experience Points accumulate while logged out in a safe area | 10.00% |
| Presence | Increases the combat effectiveness of your companion | 50+ |
| Repair Cost | Reduces the cost to repair the durability of equipment | 1.00% |
| Proc Chance (Starship Booty) | Grants a chance to loot Galactic Starfighter and space mission components from standard mobs | 2.00% |
| Stim Longevity | Increases the duration of stims | 3.00% |
| Successful Diplomacy | Increases the chance to succeed on Investigation missions | 1.50% |
| Successful Investigation | Increases the chance to succeed in Diplomacy missions | 1.50% |
| Successful Missions | Increases the chance to succeed in Diplomacy, Investigation, Treasure Hunting, and Underworld Trading missions | 0.75% |
| Successful Treasure Hunting | Increases the chance to succeed on Treasure Hunting missions | 1.50% |
| Successful Underworld Training | Increases the chance to succeed on Underworld Trading missions | 1.50% |
| Featherweight | Reduces damage taken from falling | 1.50% |
Are Amplifiers Worth it?
It’s no secret that Amplifiers are a massive credit sink. But are they worth it? Honestly, it depends on the content you do in the game. For NIM Raiders and PvPers, having the extra stats could mean the difference in clearing content or winning a match.
In PvP, amplifiers give you a competitive edge, especially in Ranked play. In PvE, they give players that extra boost in role performance that makes clearing NIM content a little easier.
So in short, for the majority of players, the answer is no. It is not worth spending your credits on them. Amplifiers will make little difference to your ability to play the majority of content in the game. For those who want to transition to top-tier content, however, it is certainly encouraged to gradually use Amplifiers.
If you’re into other parts of the game, like crafting, though, it may not hurt to gradually invest in amplifiers.
What is the most effect way to get Amplifiers?
The introduction of the rarity locking system can certainly make it easier for you to get the amplifiers you want. But at a steep cost that certainly is not worth it and/or out of reach to the average player.
Instead, to start off with, I would recommend whenever you get a 306 Armouring 80 or 80-1 piece that you attempt to recalibrate/reroll to the Amplifier you want. But, only go up to 50,000 Credits otherwise it starts to get too costly. Then wait for the weekly reset or until you get another armouring piece to try again.
Thank you for reading my Guide! If you have any questions, let me know!
![Mek-Sha [Heroic 4] Turf War and ‘The Don’ Achievement Guide](https://mmobits.com/wp-content/uploads/2020/02/don-header-1024x437.png)
